1
Getting Started.
Download the app, create your account, and get a complete picture of your finances in minutes.
- Download AuraInsights from the App Store (iOS) or Google Play (Android).
- Sign in using Google, Apple ID, or your email address. Your 14-day free trial starts automatically.
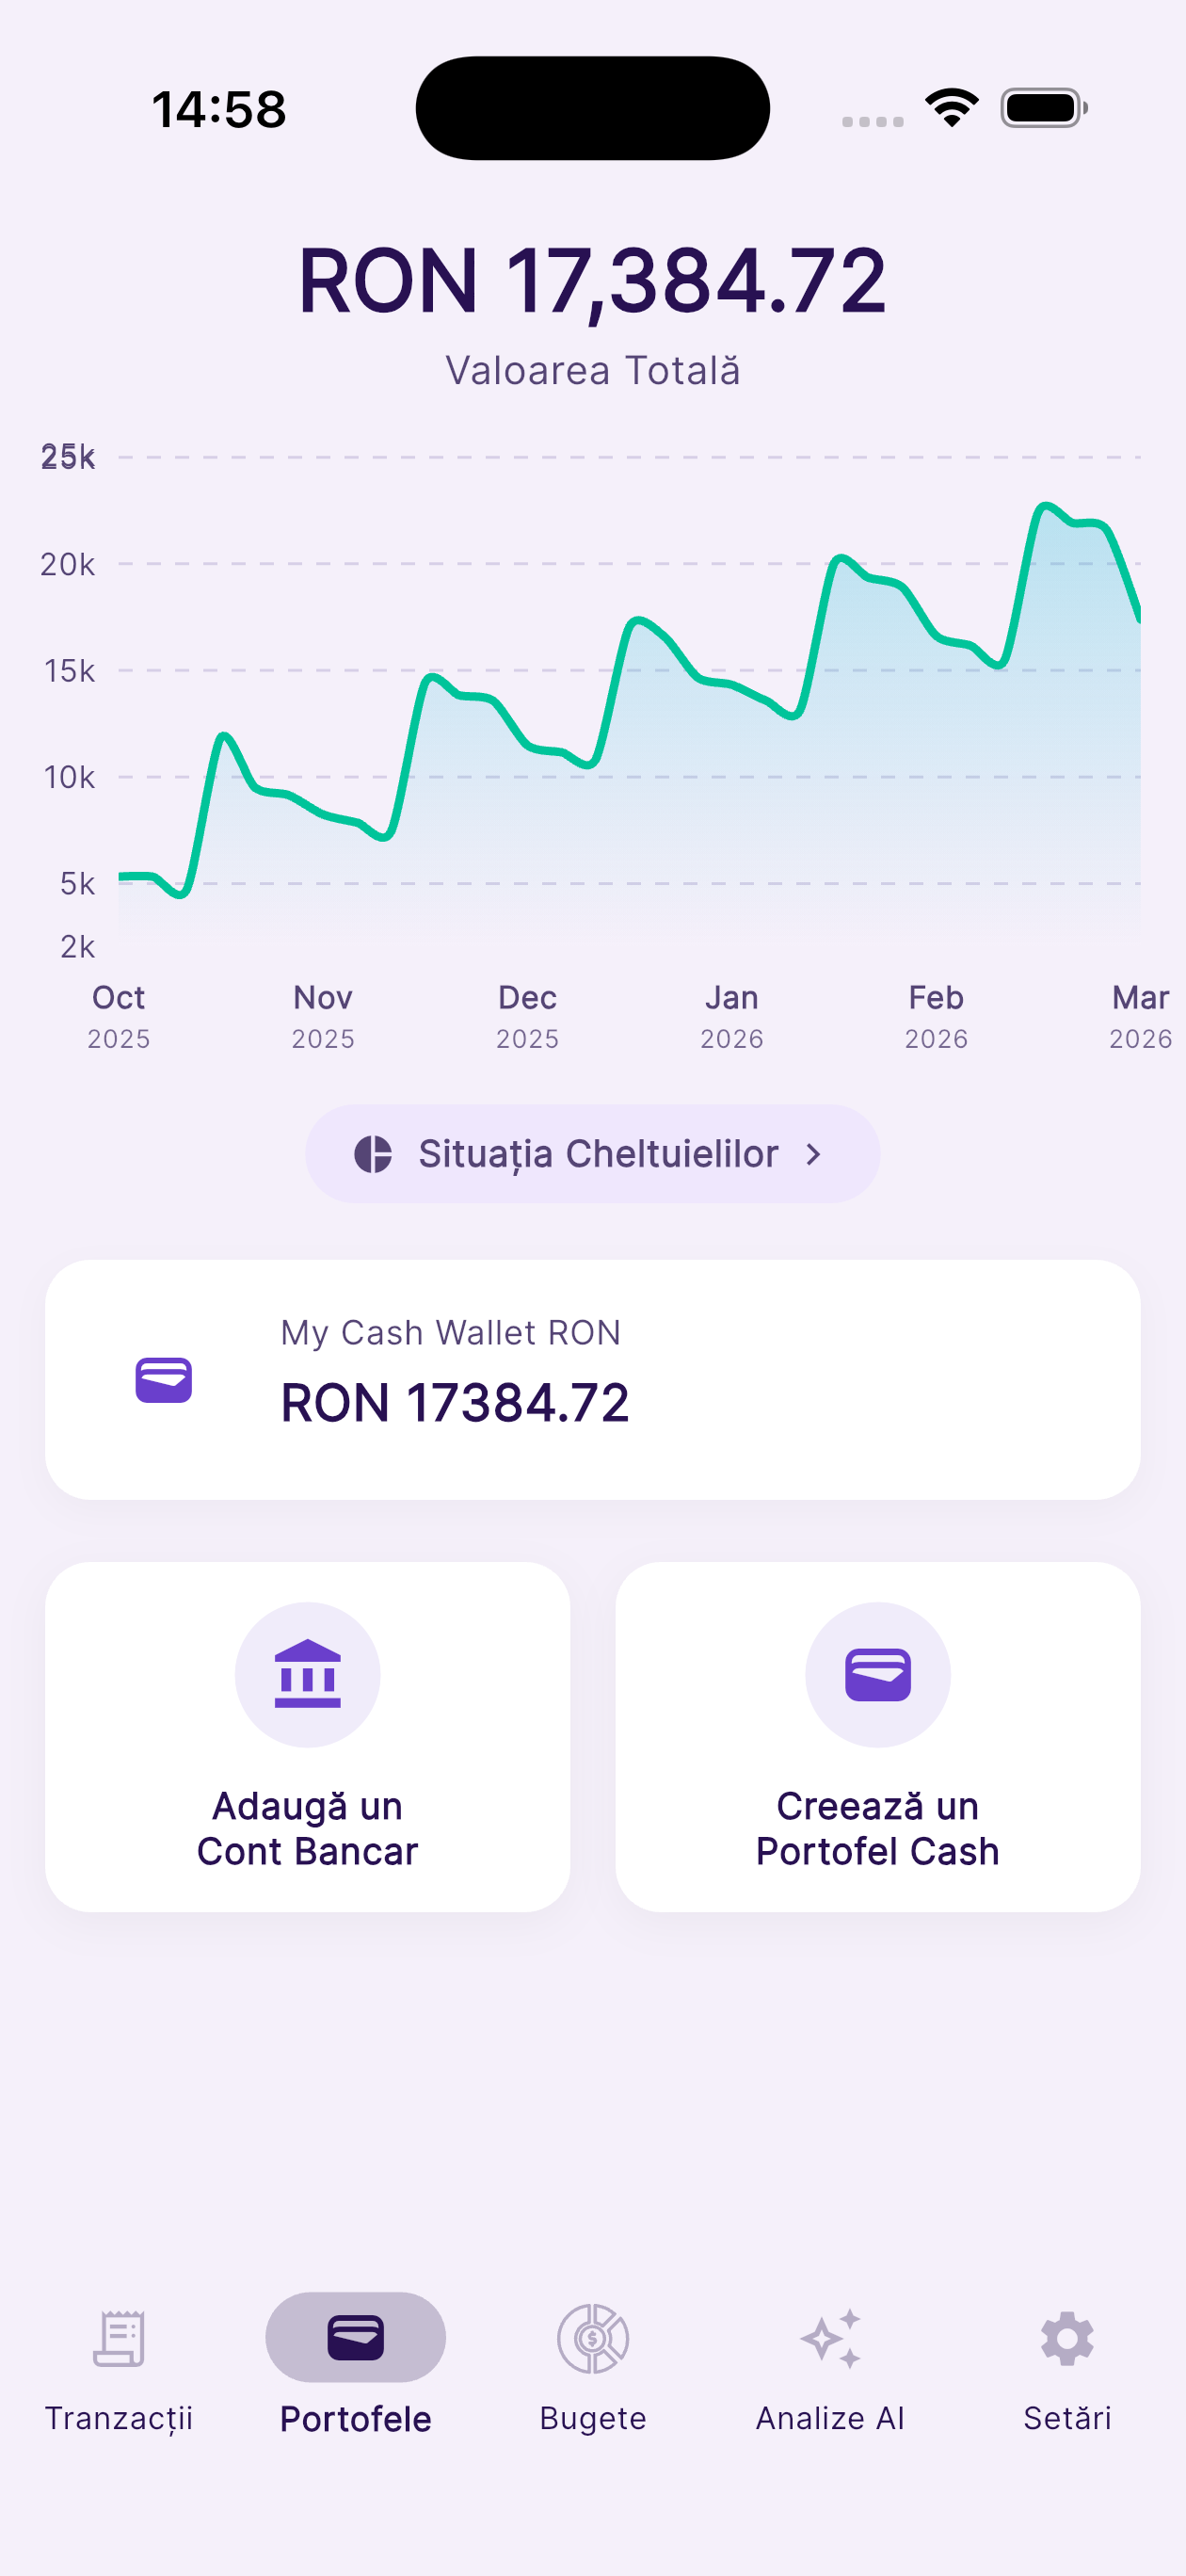
- On first launch, the Home screen shows your total wealth overview. Your balance starts at zero until you add wallets or connect a bank.
- Create a Cash Wallet first — go to More → Cash Wallets → (+). You need at least one wallet or connected bank account before you can add or save manual transactions.
- Use the bottom navigation to move between Timeline, Wallets, Budgets, AI Insights, and More.
💡 Tip: Create a Cash Wallet first to start tracking manually, or connect a bank account for automatic transaction import.
2
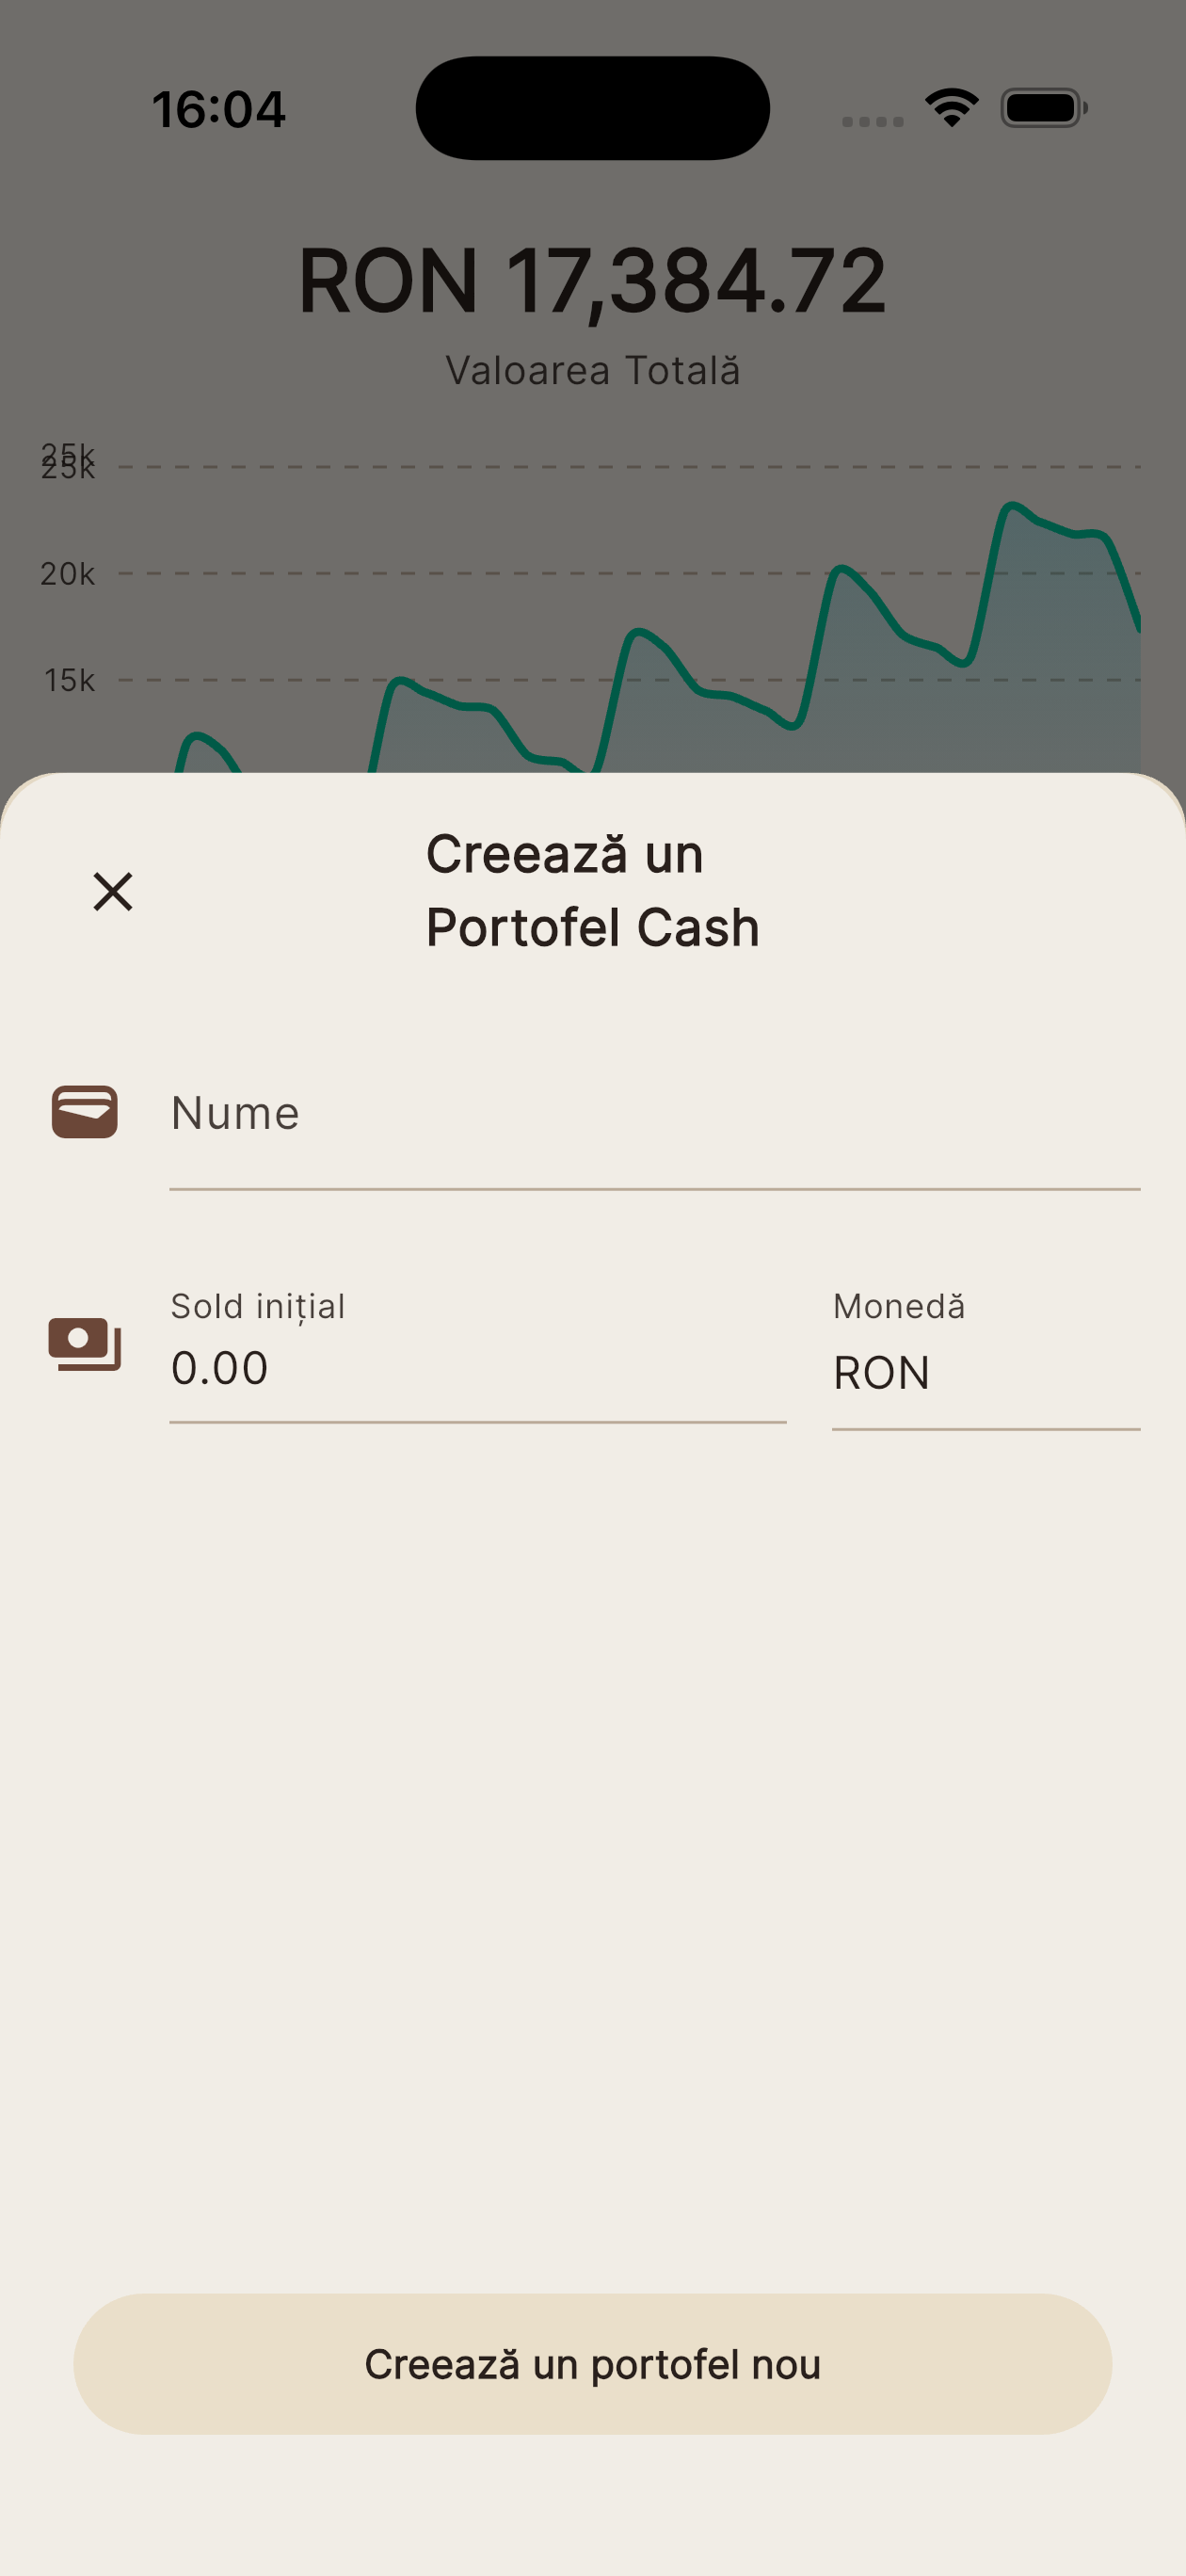
Cash Wallets.
Create and manage wallets for cash, digital payment apps, or any account you track manually.
- Create: Go to the Wallets tab → tap Cash Wallets → tap (+). Enter a name, choose an icon and color, set the starting balance and currency, then tap Save.
- Edit: Open a wallet → tap the edit (pencil) icon in the top-right. Change the name, icon, color, or balance, then tap Save.
- Delete: Open a wallet → tap Edit → scroll to the bottom → tap Delete Wallet. Confirm — this is permanent.
- Visibility: Long-press a wallet on the Home screen to hide it from the total wealth overview without deleting it.
- Multiple currencies: Each wallet can hold a different currency. Your Home screen converts all balances to your base display currency automatically.
💡 Tip: Use separate wallets for different physical envelopes, currencies, or savings jars to track them precisely.
3
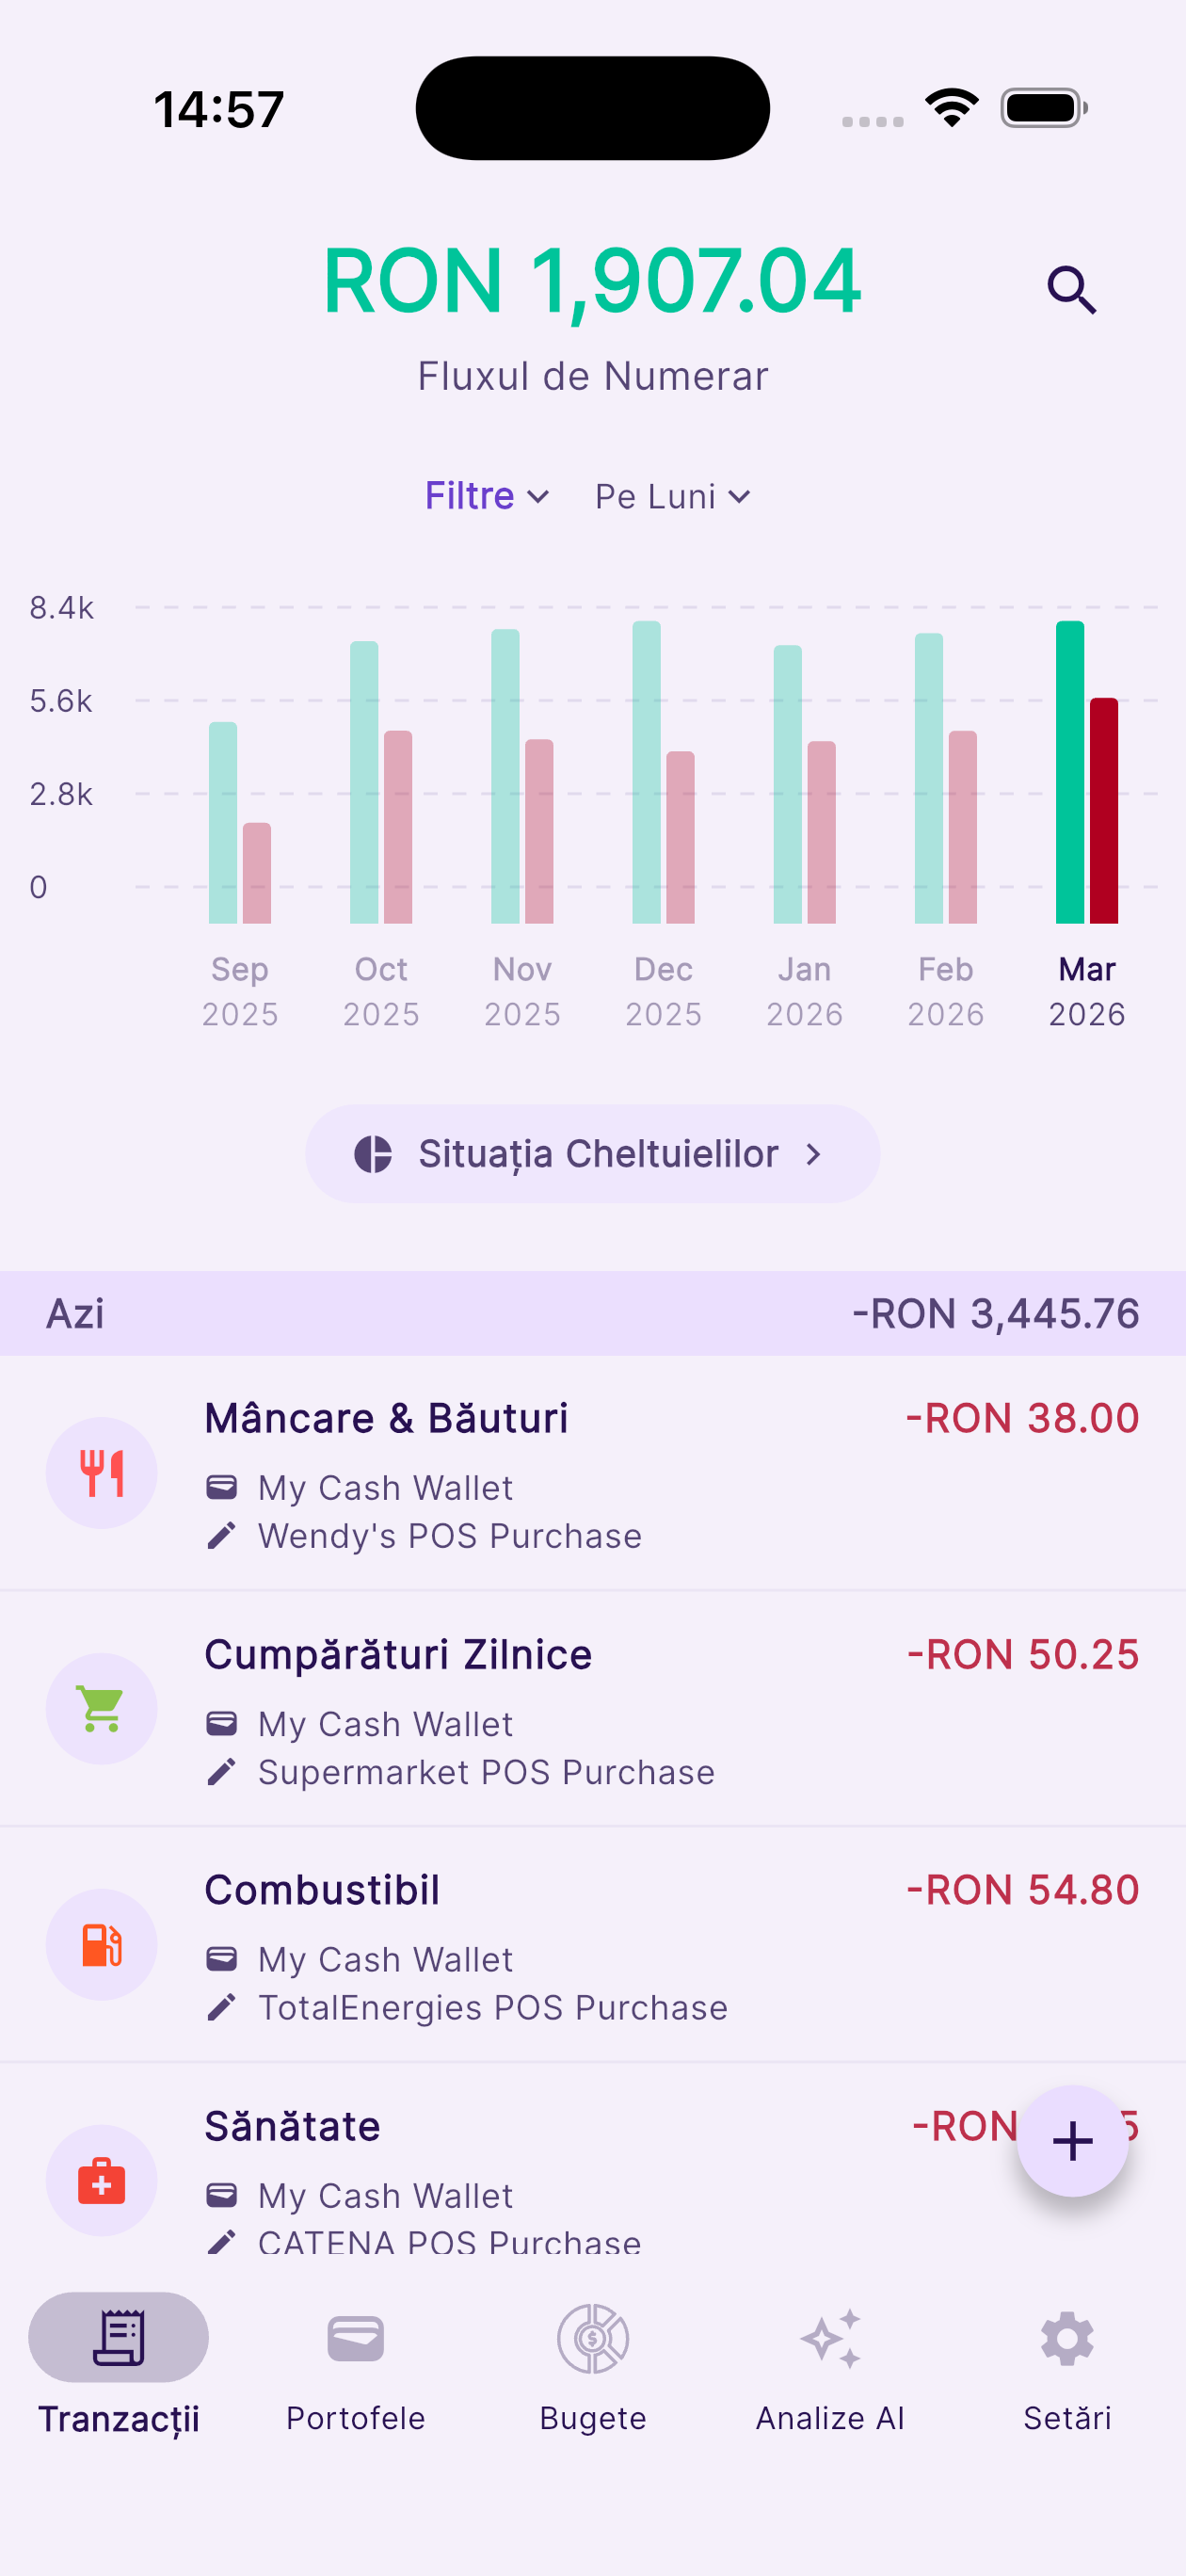
Transactions.
Add transactions manually, edit existing ones, filter your history, and keep your records precise.
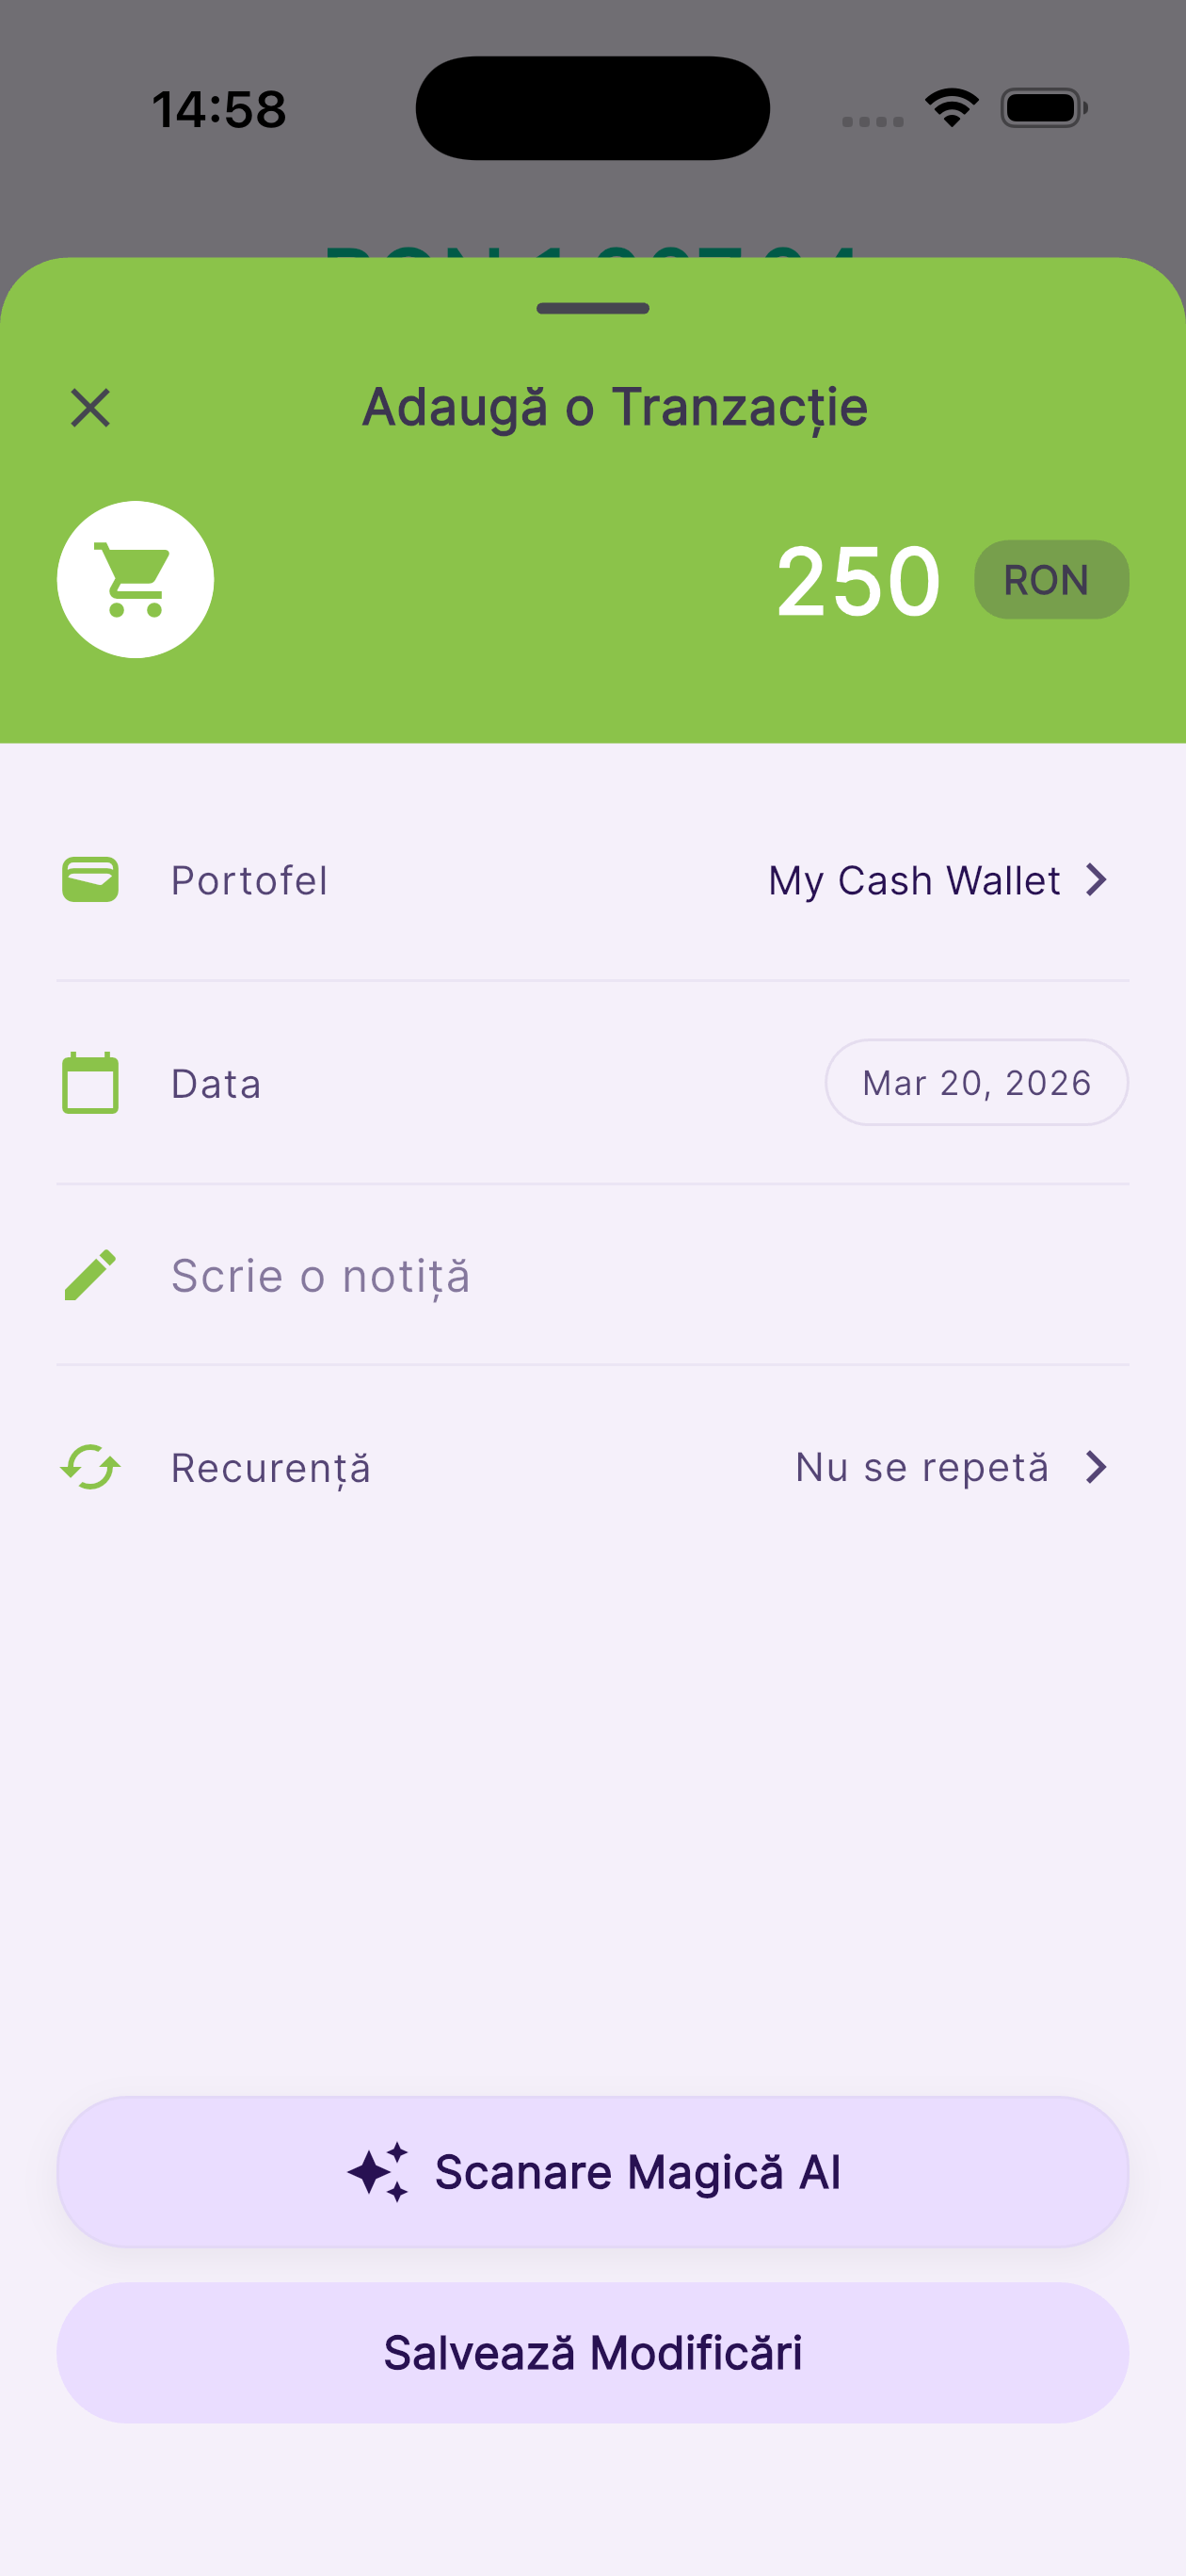
- Add manually: Tap (+) on any screen → choose Expense, Income, or Transfer. Enter the amount, select a category and wallet, optionally add a description, then tap Save.
- Edit: Open the Timeline tab → tap any transaction → modify amount, category, wallet, or description → tap Save.
- Delete: Open a transaction → scroll to the bottom → tap Delete. Confirm — your wallet balance updates instantly.
- Search: Tap the Search icon at the top of the Timeline. Type a merchant name, amount, or description to find any entry.
- Filter: Tap the filter icon on the Timeline to narrow results by date range, category, wallet, or transaction type.
- Wallet overview: Tap any wallet on the Home screen to see only its transactions, sorted by date.
💡 Tip: Use Transfer type when moving money between two of your own wallets — both balances update correctly.
4
Magic AI Scan.
Point your camera at any receipt and let Aura's AI extract and categorize the transaction instantly. Requires at least one Cash Wallet or connected bank account. Available from Sync tier.
- Before scanning, make sure you have at least one Cash Wallet or connected bank account — you'll need to assign the scanned transaction to a wallet when saving.
- Point your camera at a printed or digital receipt. Hold steady for 1–2 seconds for best results.
- Aura's AI extracts the merchant name, total amount, currency, and date automatically.
- Review the pre-filled transaction details. The AI also suggests a category based on the merchant.
- Adjust the category, wallet, or any detail if needed, then tap Save.
💡 Tip: Works best with clear, well-lit receipts. Both physical thermal receipts and on-screen digital receipts are supported.
5
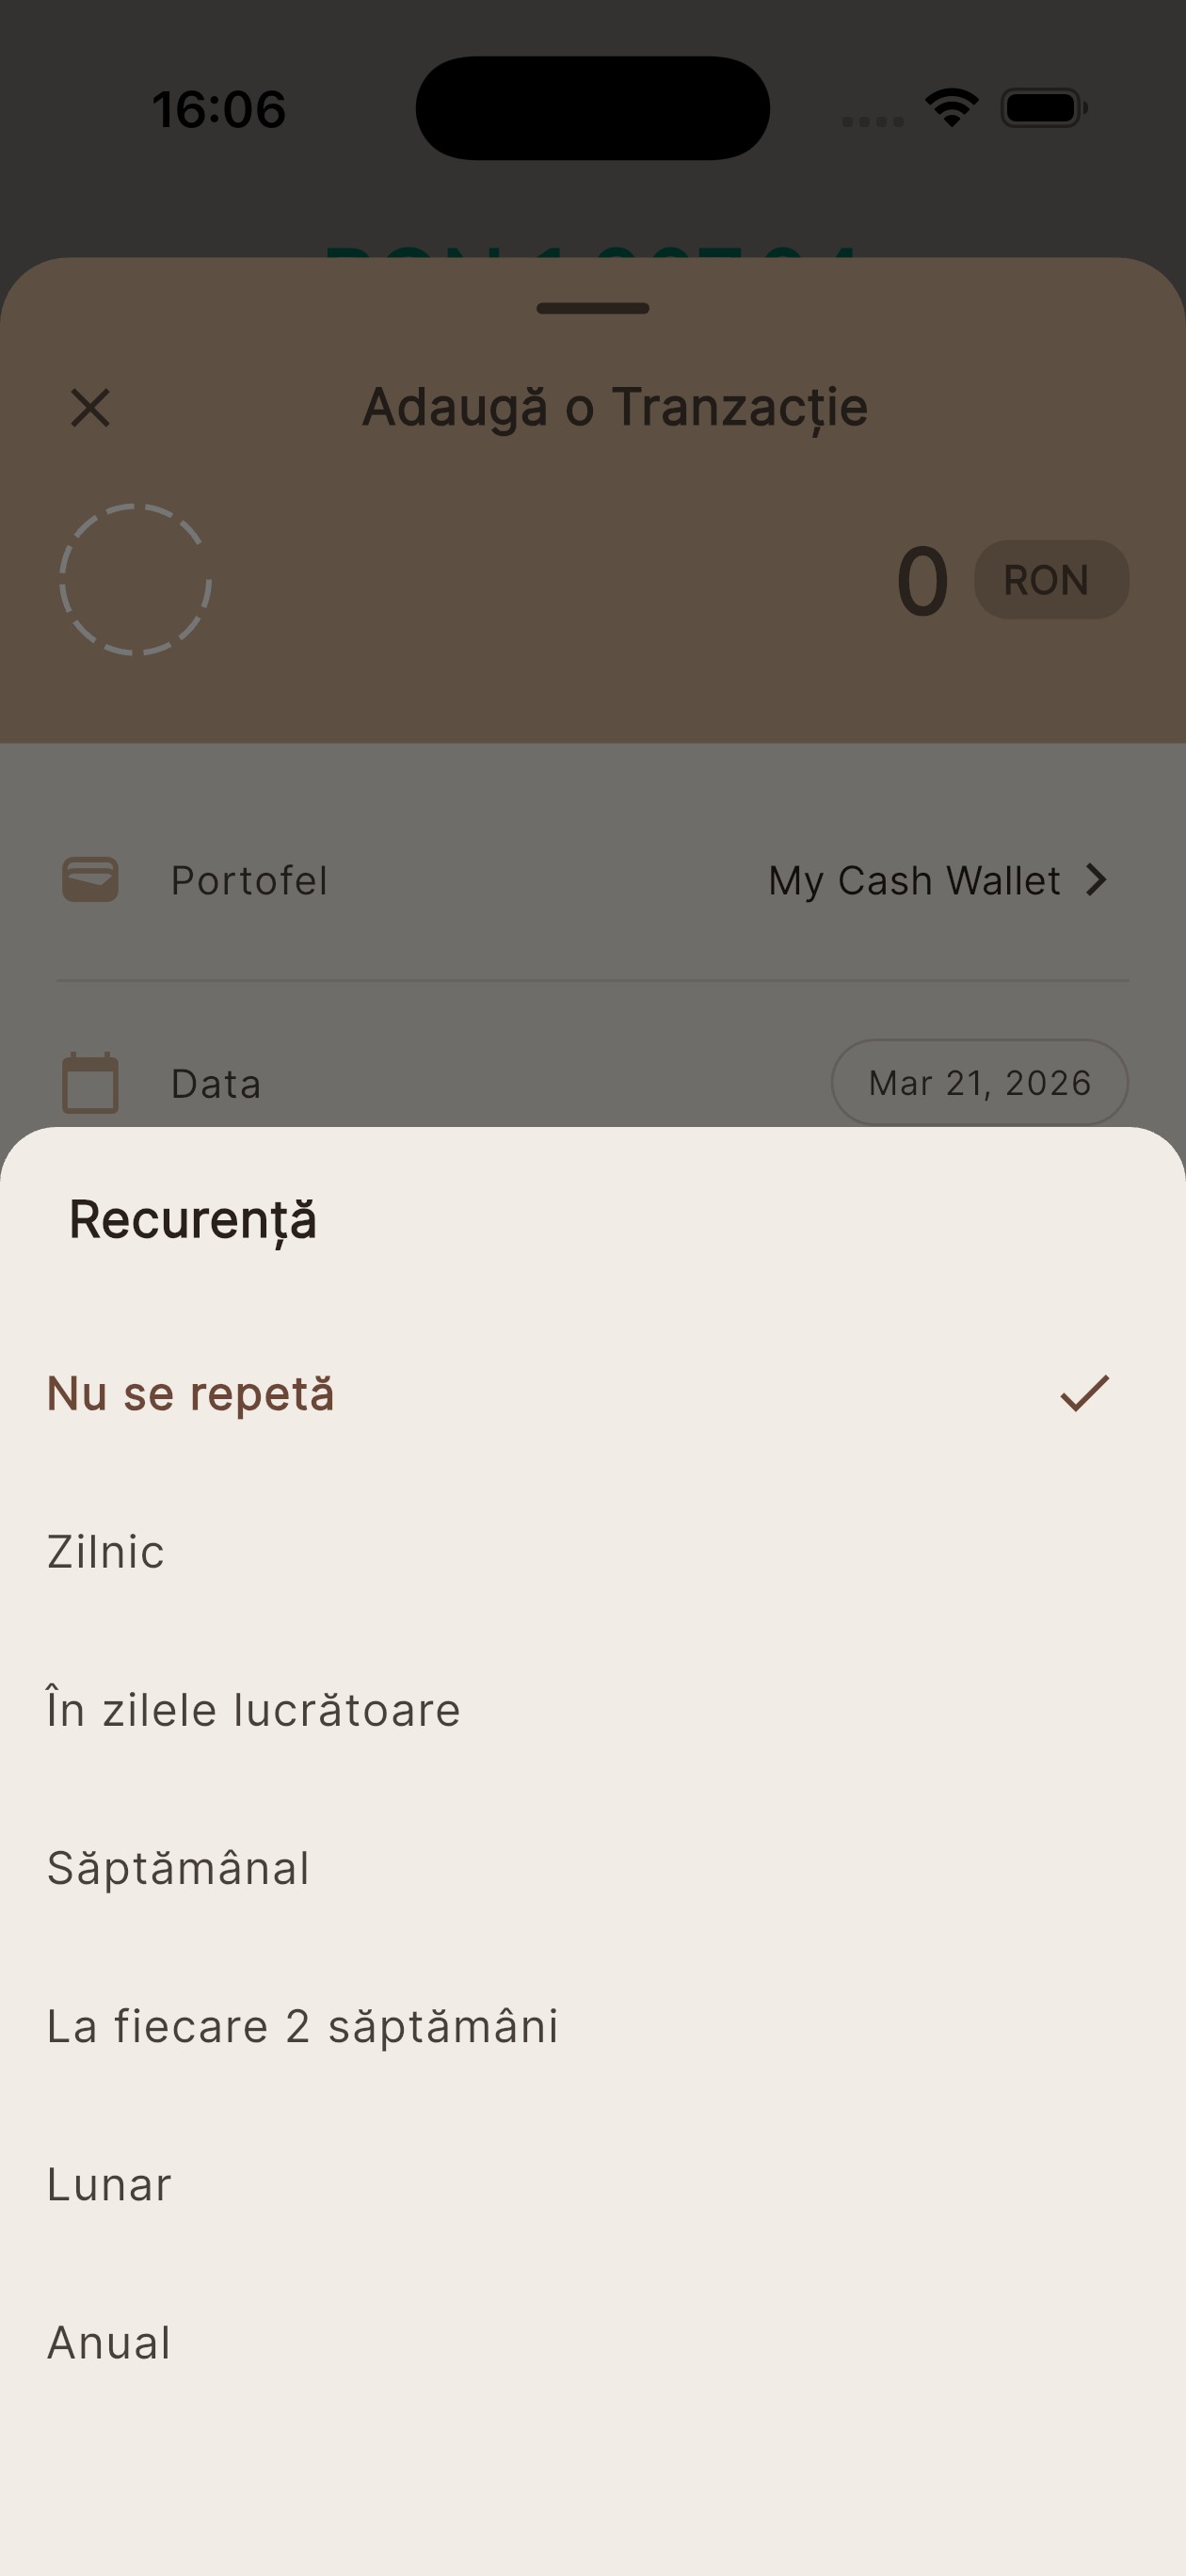
Recurring Rules.
Automate repetitive transactions like rent, subscriptions, or salary — set once and Aura handles the rest.
- Create: When adding a transaction manually, toggle Make Recurring before saving. Choose a frequency: Daily, Work Days, Weekly, Monthly, Quarterly, or Yearly.
- Optionally set an end date. Leave it blank for an open-ended recurring rule.
- Tap Save — the rule is created and will execute automatically on schedule.
- View rules: Go to More → Scheduled Transactions. All active rules are listed with their next execution date.
- Edit a rule: Tap a rule → modify the amount, description, or frequency → tap Save.
- End a rule: Tap the rule → set an end date or tap Delete Rule. Past transactions generated by the rule remain in your history.
💡 Tip: Use recurring rules for rent, utilities, monthly salary, gym memberships, and any predictable expense or income.
6
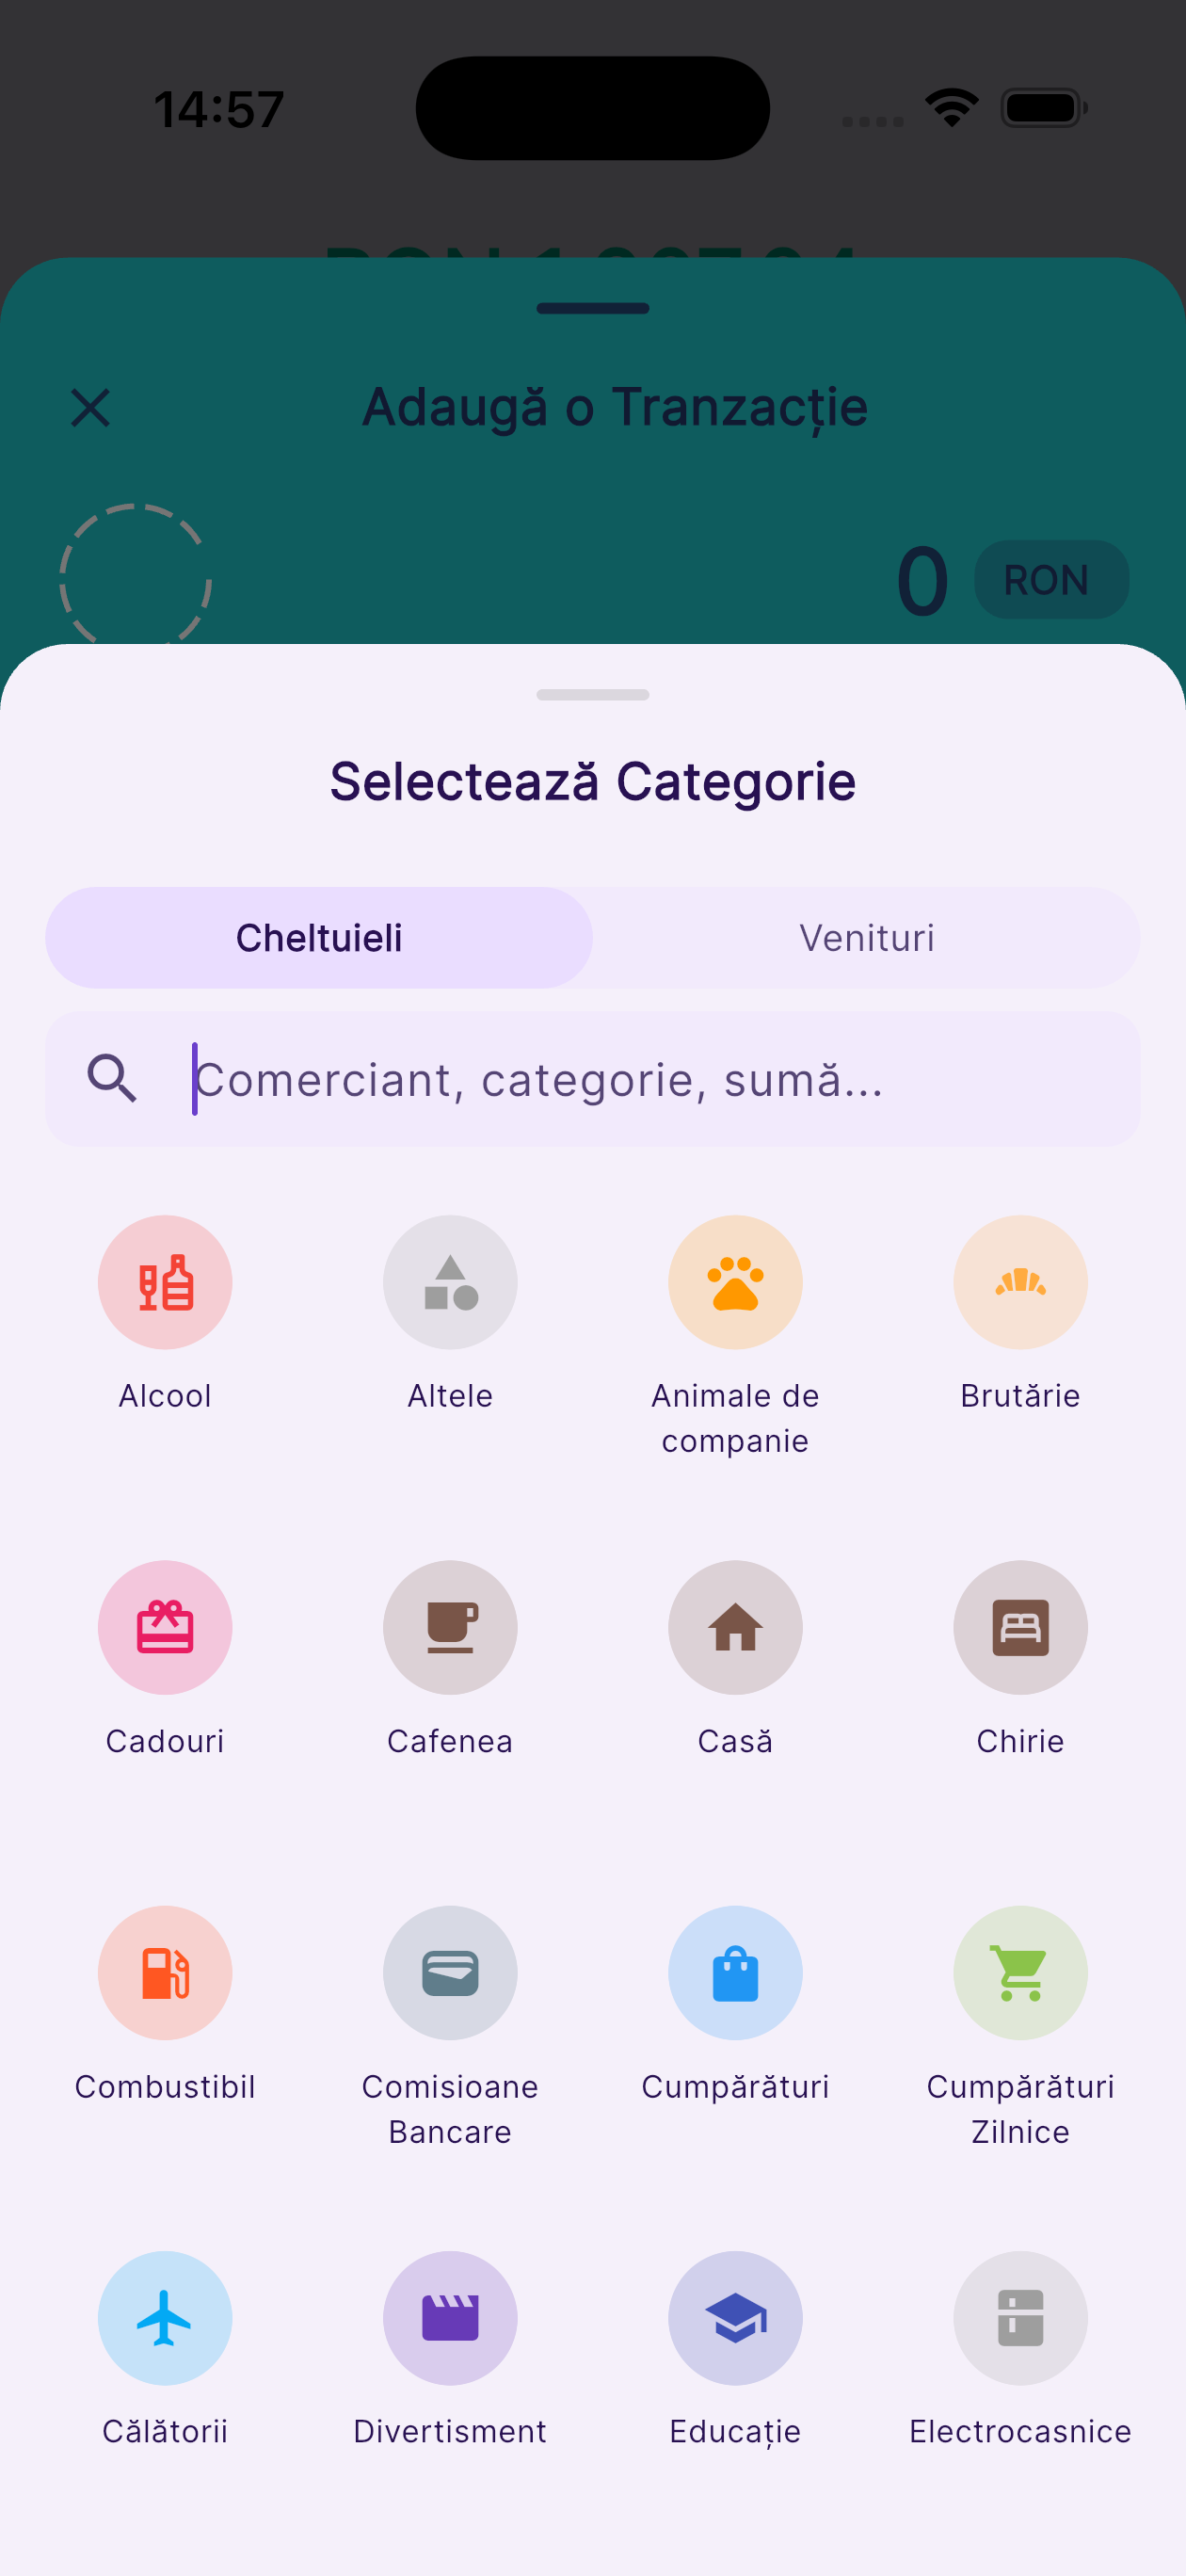
Categories.
Organize your spending with the built-in category set or create your own custom categories with unique icons and colors.
- Browse: Go to More → Categories. System categories (Groceries, Transport, Health, etc.) are listed alongside any you've created.
- Create: Tap (+) → enter a name, choose an icon from 70+ options, and pick a color → tap Save.
- Edit a custom category: Tap on any custom category (system categories cannot be edited) → modify name, icon, or color → tap Save.
- Delete: Open a custom category → scroll to the bottom → tap Delete Category. Transactions previously assigned to it move to the Other category.
- Custom rules: Open any category → tap Add Rule to make a keyword automatically assign future transactions to this category.
💡 Tip: Create custom categories that match your life — Freelance Income, Side Business, Dog Expenses, or anything your budget calls for.
7
Budgets.
Set smart spending limits per category, wallet, or time period and receive alerts before you overspend. Available from Vision tier.
- Create: Go to the Budgets tab → tap (+) in the top-right corner.
- Enter a name (e.g. "Monthly Groceries"), a spending limit, and the currency.
- Choose a recurrence: One-time, Weekly, Monthly, Quarterly, or Yearly.
- Optionally, select specific categories to track (leave empty to track all expenses) and/or specific wallets to include.
- Tap Save. Your budget appears as a card with a real-time progress bar.
- Edit or delete: Open a budget → tap the Edit (pencil) icon → modify any field or scroll to the bottom to delete.
💡 Tip: Create one budget per major spending category (Food, Transport, Entertainment) for a complete monthly overview.
8
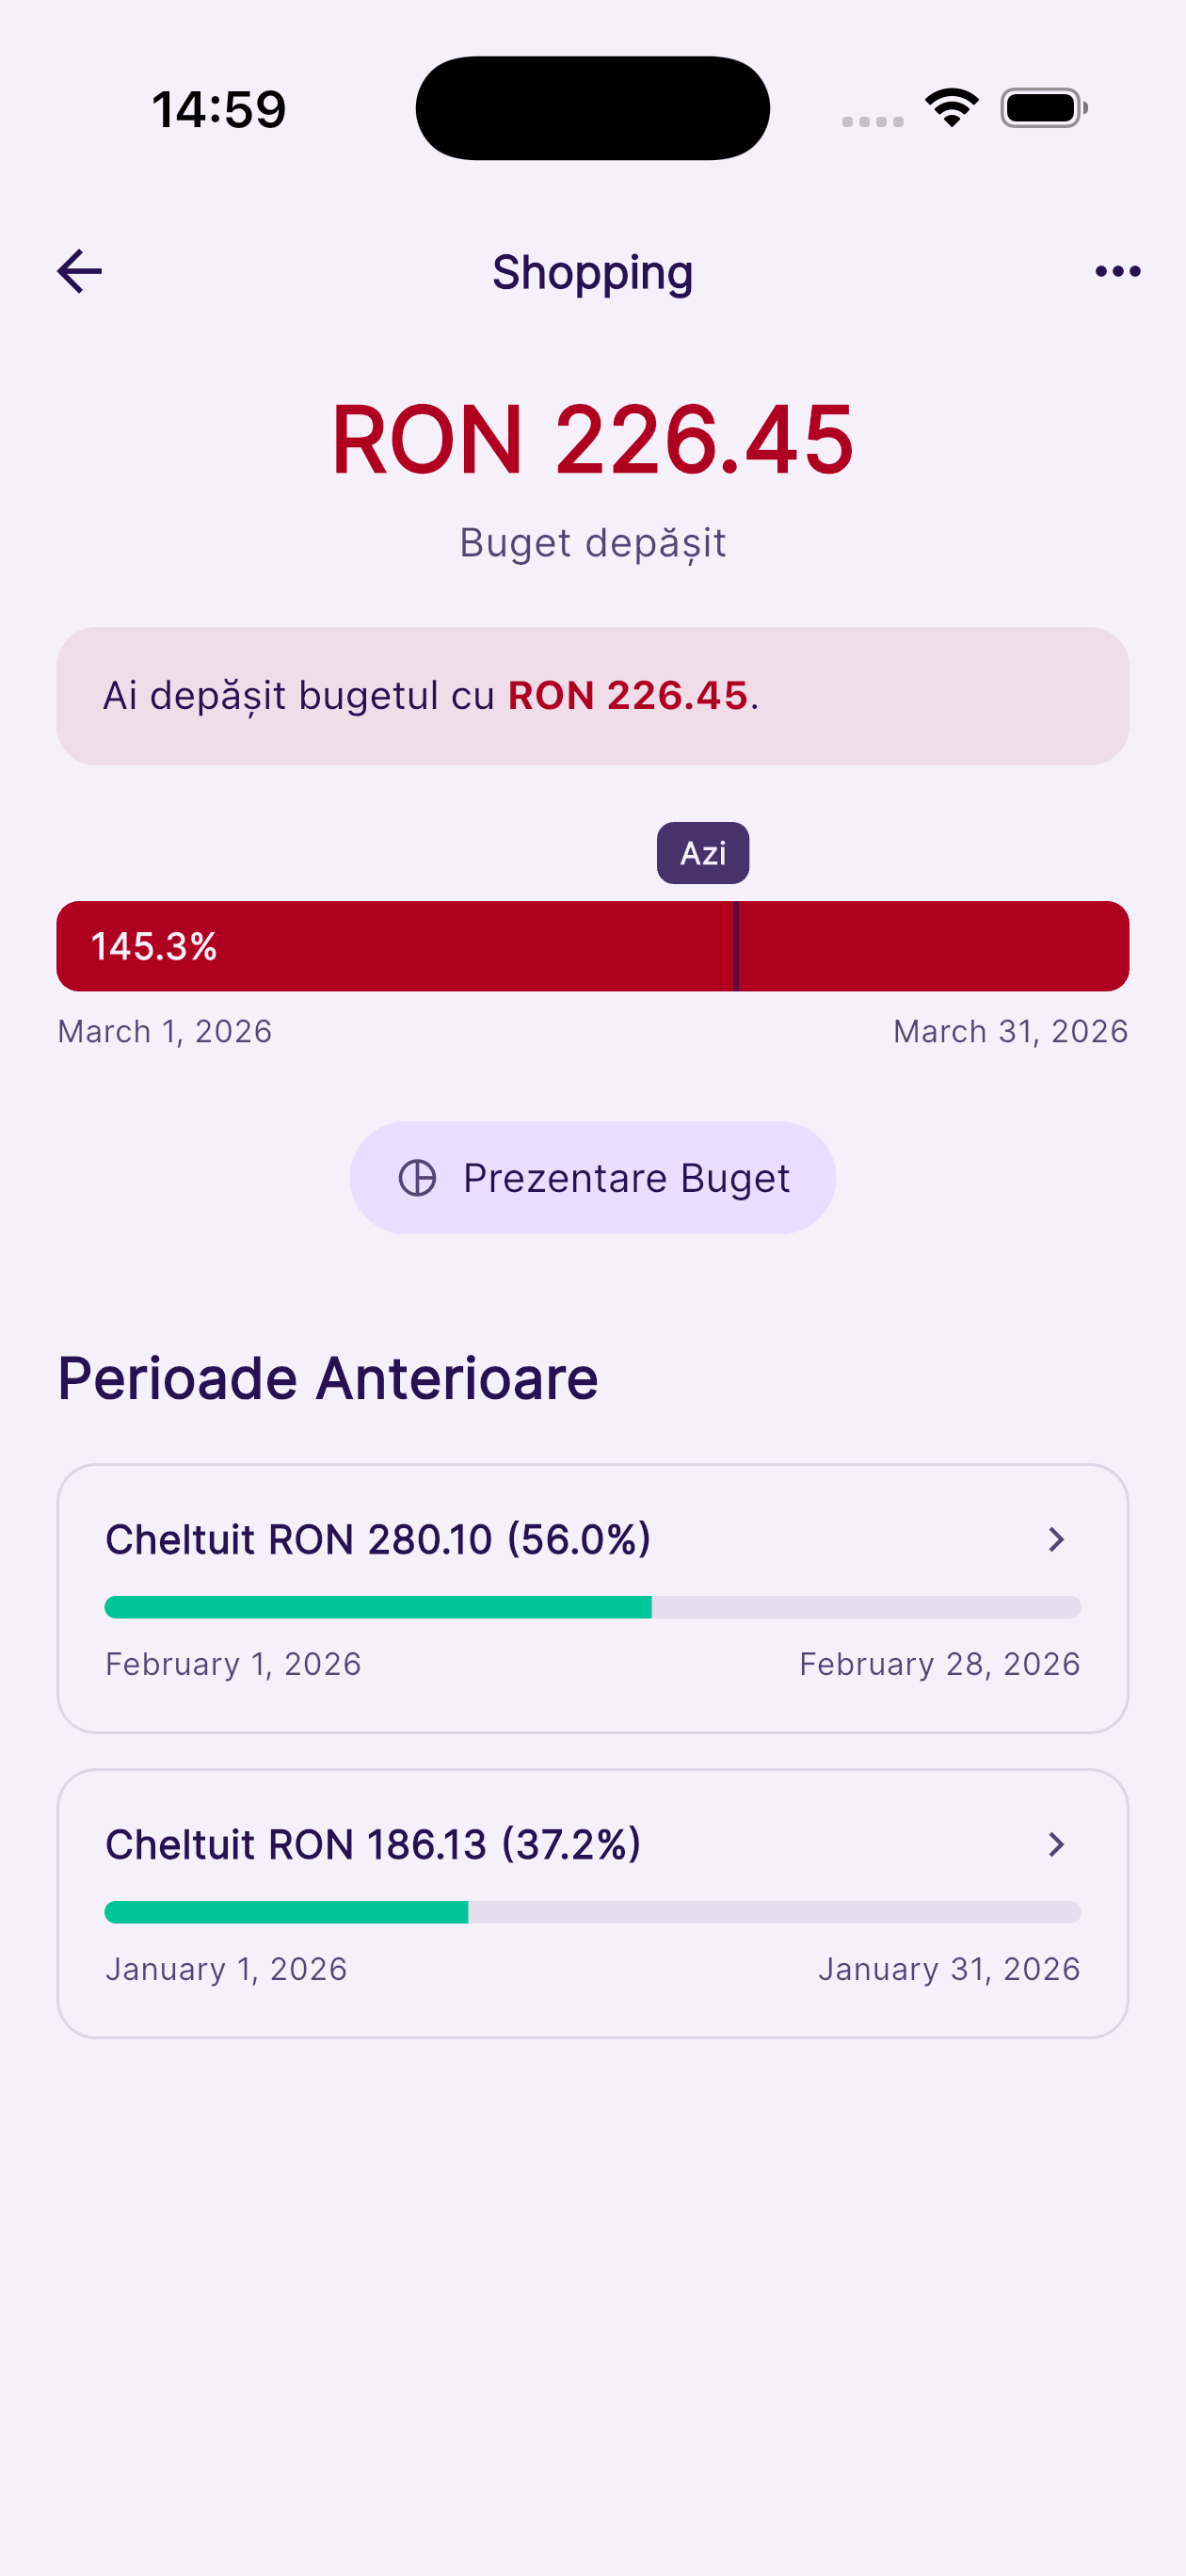
Budget Overview.
Dive deep into a budget period: see exactly how much was spent, per category, with a visual donut chart.
- Tap on any budget card to open the detail view.
- The progress card shows: amount spent vs. limit, percentage used, and days remaining in the current period.
- Tap a period card to open the Budget Overview. A donut chart breaks down spending by category.
- Tap a category row in the donut chart breakdown to see all individual transactions for that category within this budget period.
- Scroll down in the detail view to see a history of previous periods and how your spending compared to the limit over time.
💡 Tip: Past periods in red exceeded the budget limit; green periods stayed under.
9
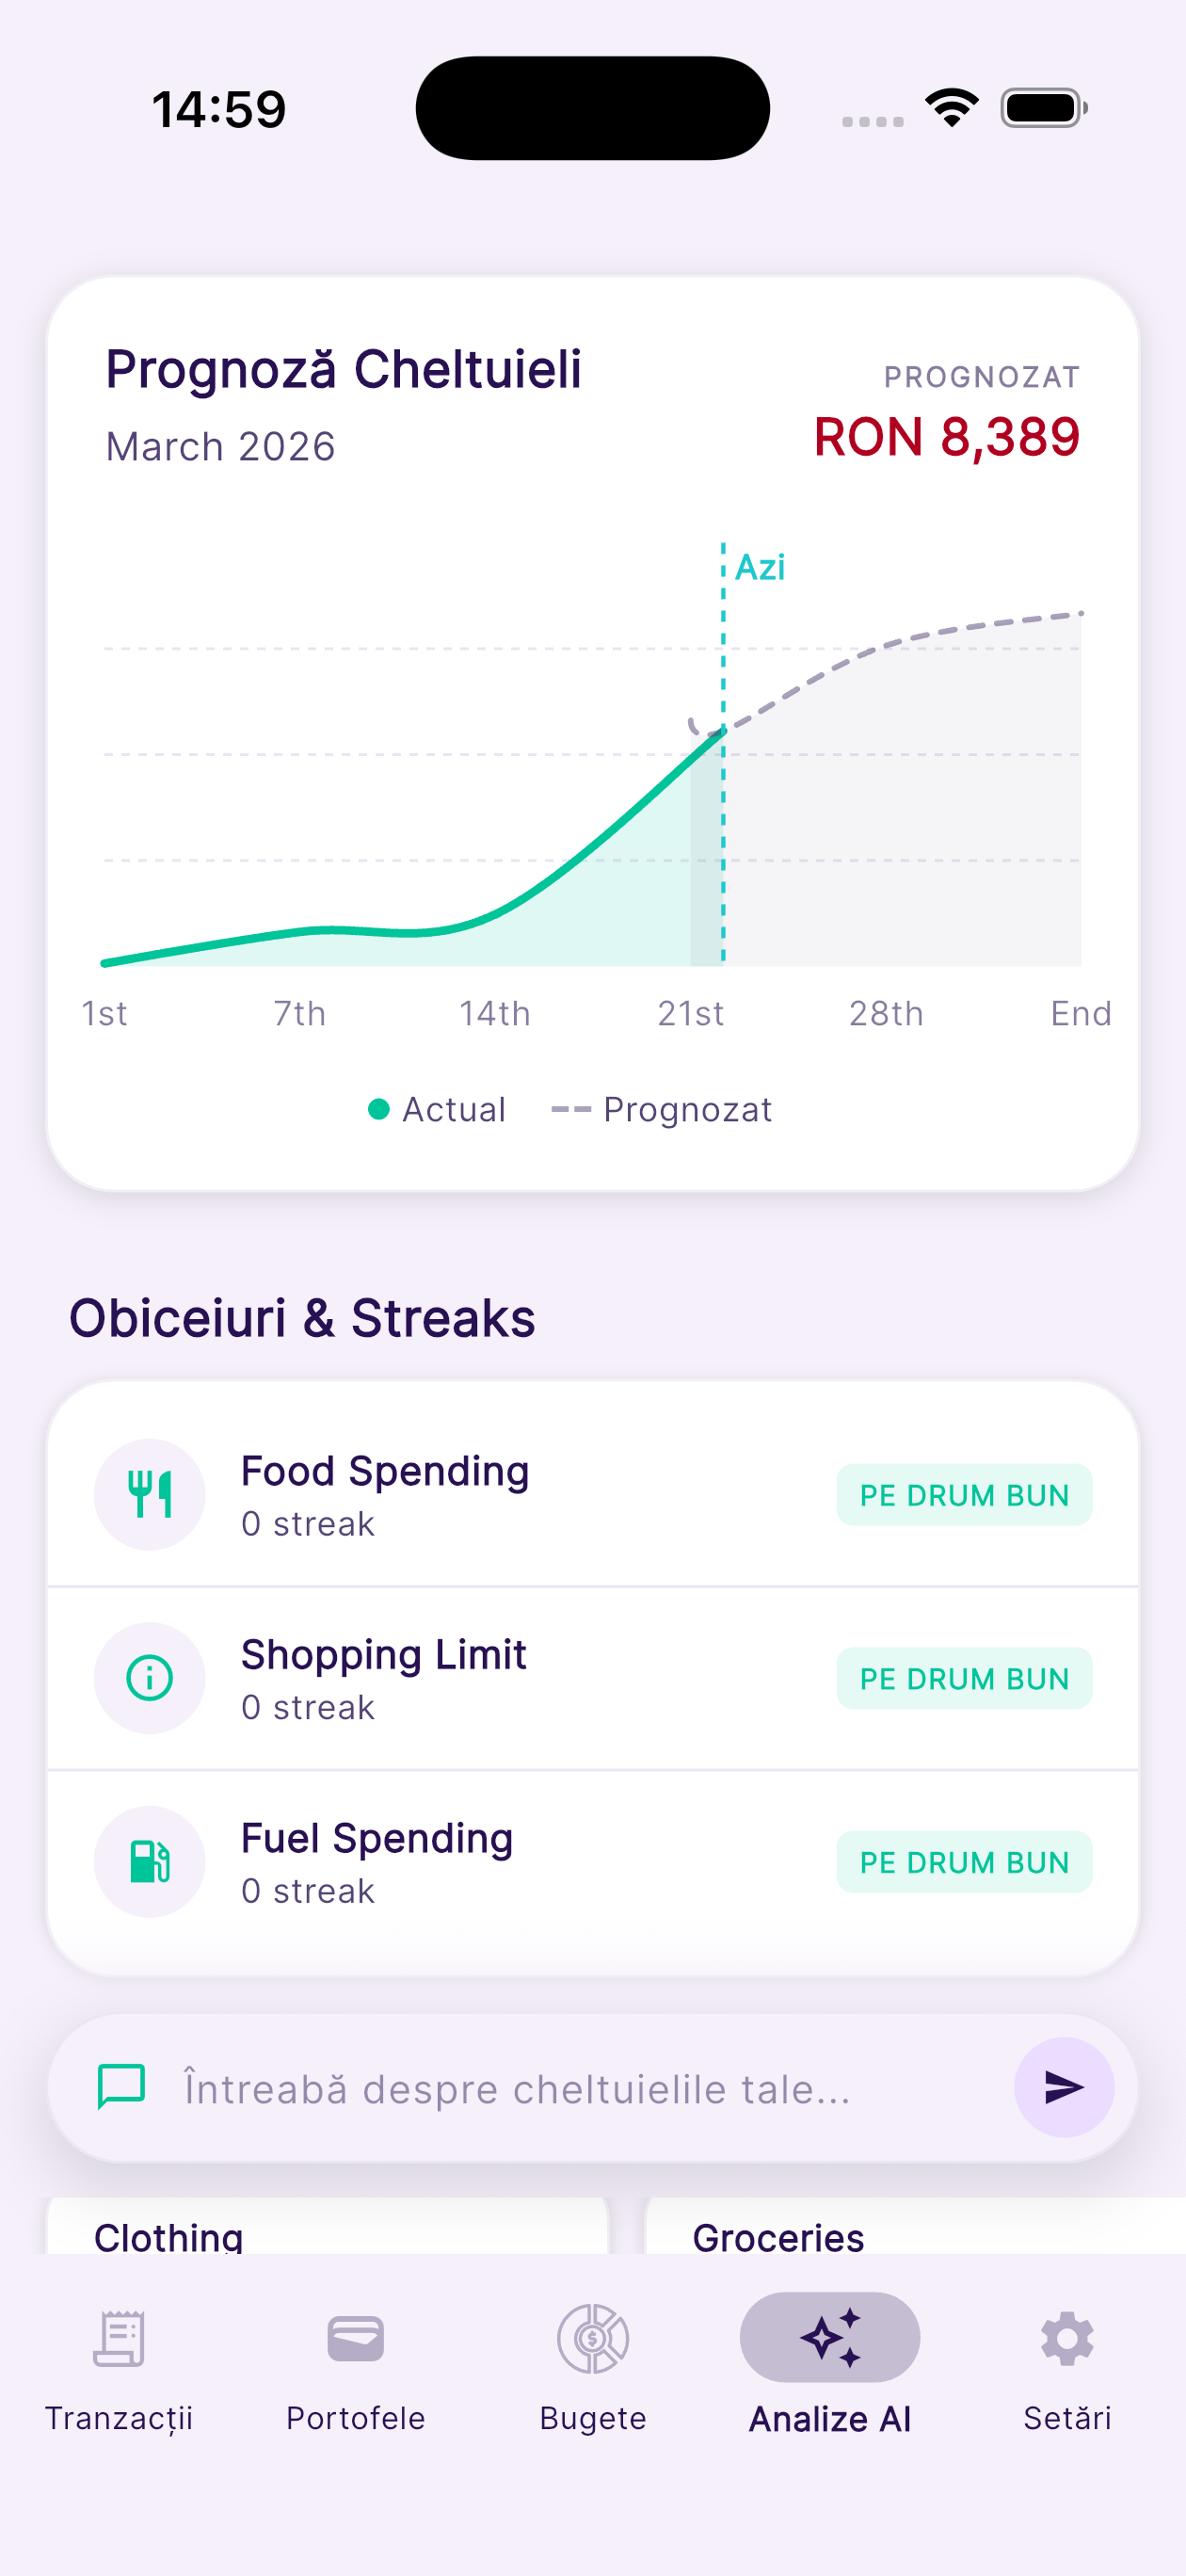
AI Insights & Spending Forecast.
Your personal AI financial analyst — powered by Gemini. Understands your patterns and projects your month-end total. Available from Sync tier.
- Tap the AI Insights tab (sparkle icon in the bottom navigation).
- The Financial Pulse section shows your top spending category, total saved this month, and key observations.
- Scroll to Spending Forecast. The green solid line shows your actual spending so far this month; the dashed line projects your end-of-month total based on current pace.
- The Suggested Actions section lists AI-generated recommendations to reduce unnecessary expenses.
- Scroll further to see Past Monthly Reports — a full AI analysis of previous months.
- Pull down on the screen or tap Refresh to generate fresh insights based on your latest transactions.
💡 Tip: Insights refresh automatically every 24 hours. Tap refresh to force an update after adding new transactions.
10
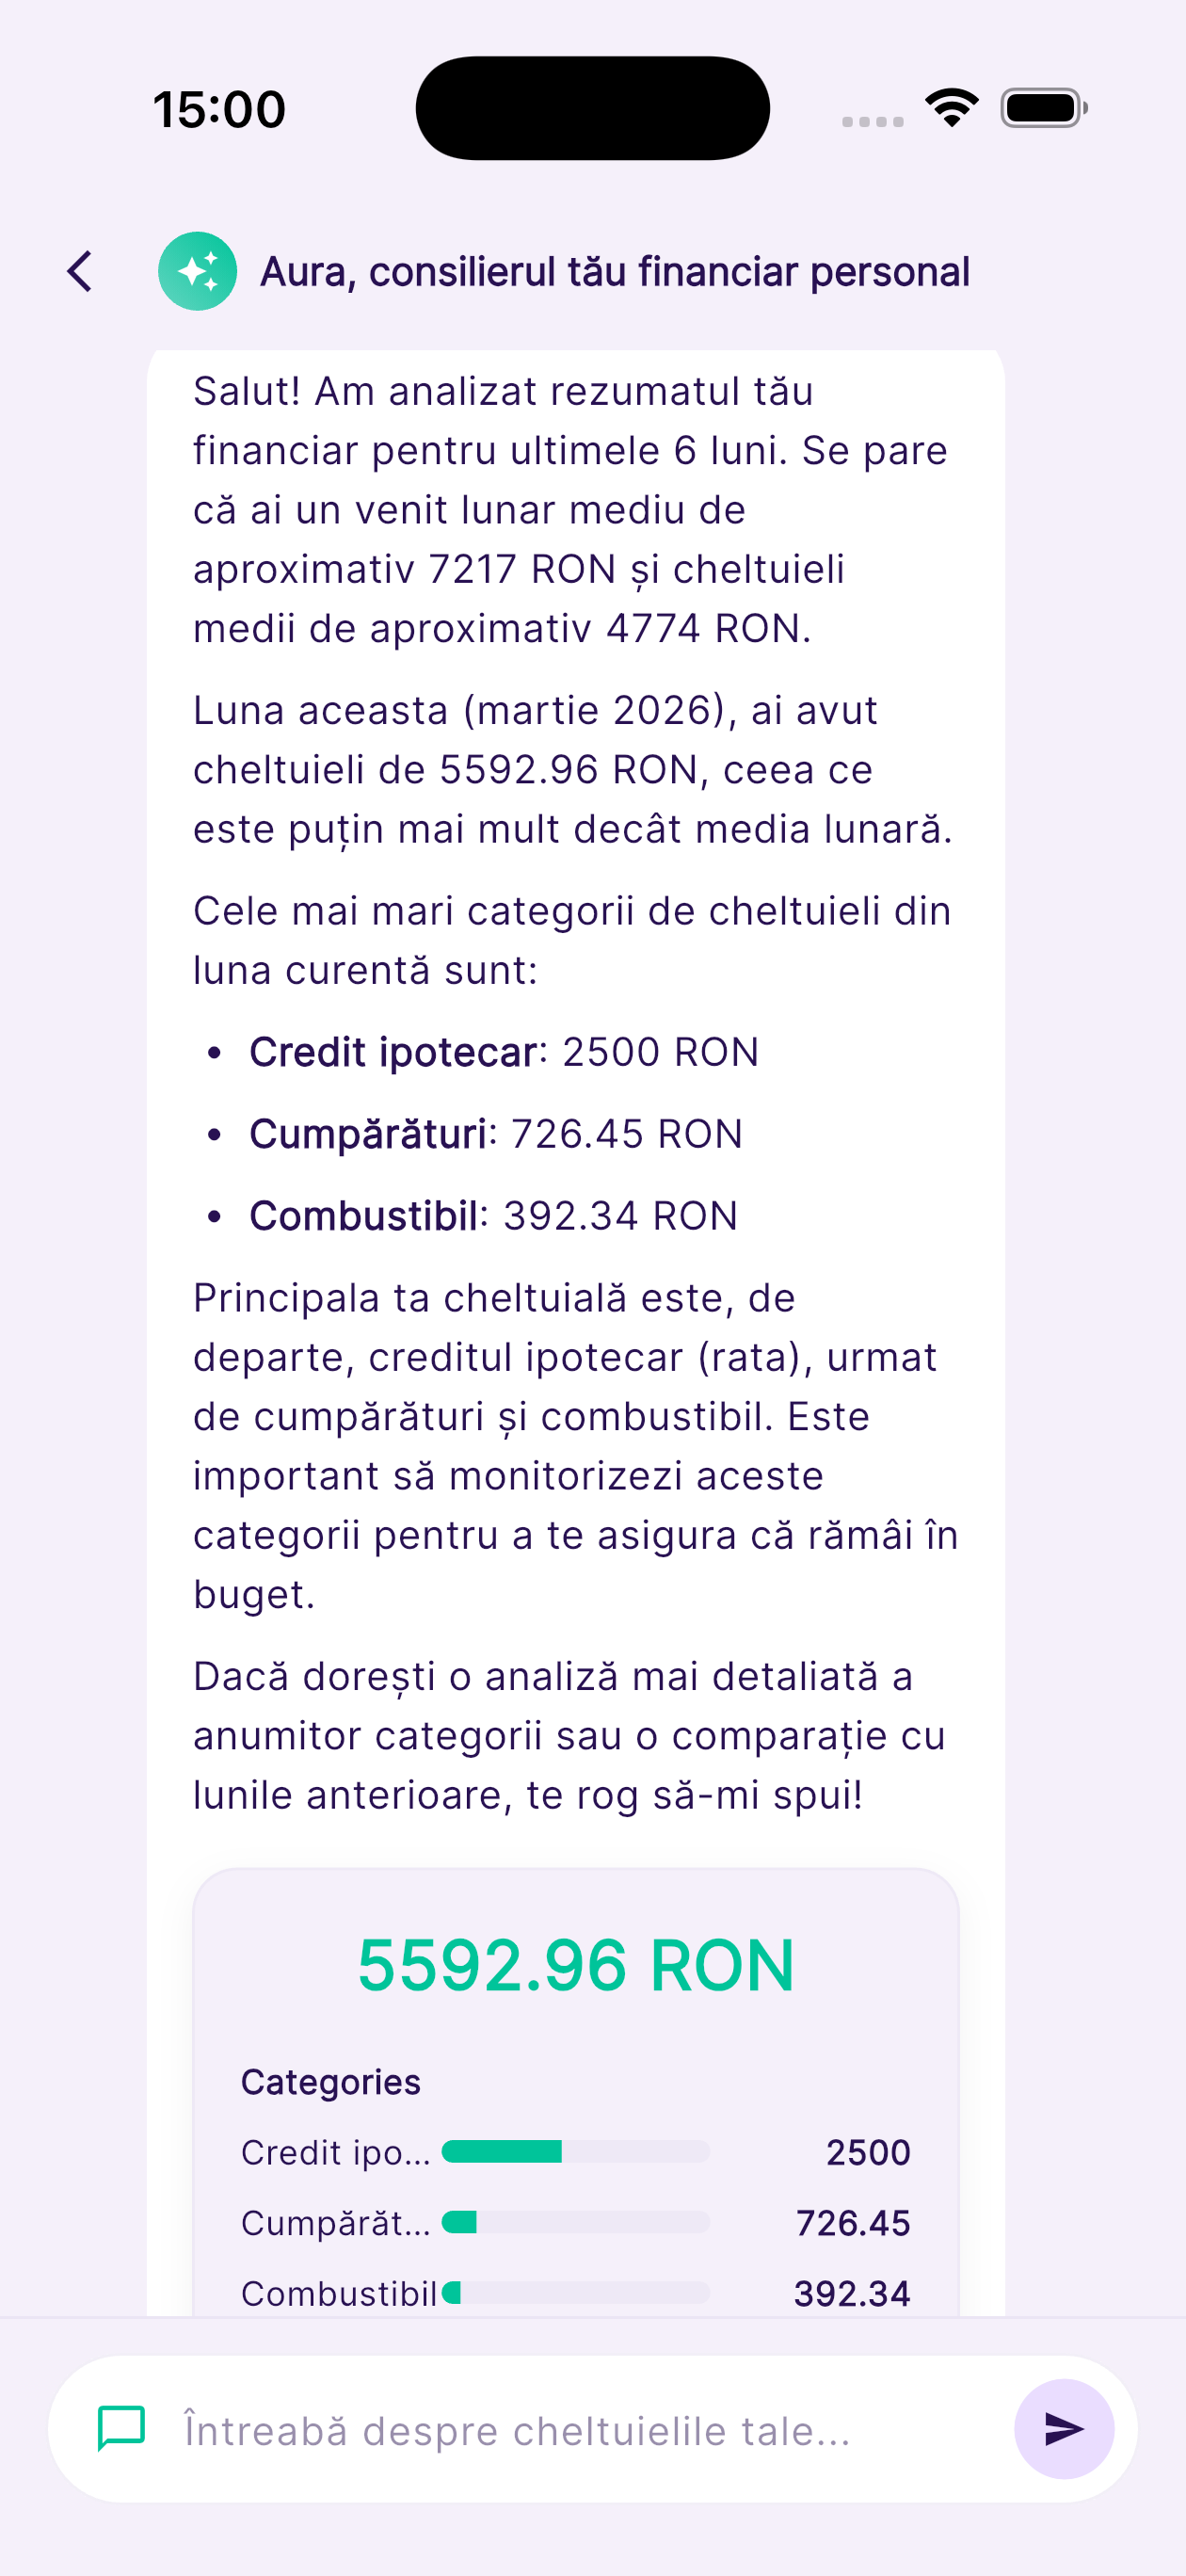
AI Chat.
Ask Aura anything about your finances in plain language. Get data-backed answers from your real transaction history. Available from Sync tier.
- From the AI Insights screen, tap the Chat icon or scroll to the Chat section.
- Type any question about your finances in natural language and tap Send.
- Example questions: "How much did I spend on food last month?", "What's my biggest expense category this year?", "Am I on track with my grocery budget?"
- Aura analyzes your real transaction history and responds with specific, data-backed answers in seconds.
- Tap a suggested question chip to explore common financial queries without typing.
💡 Tip: The more transactions you have, the richer and more accurate Aura's analysis becomes.
11
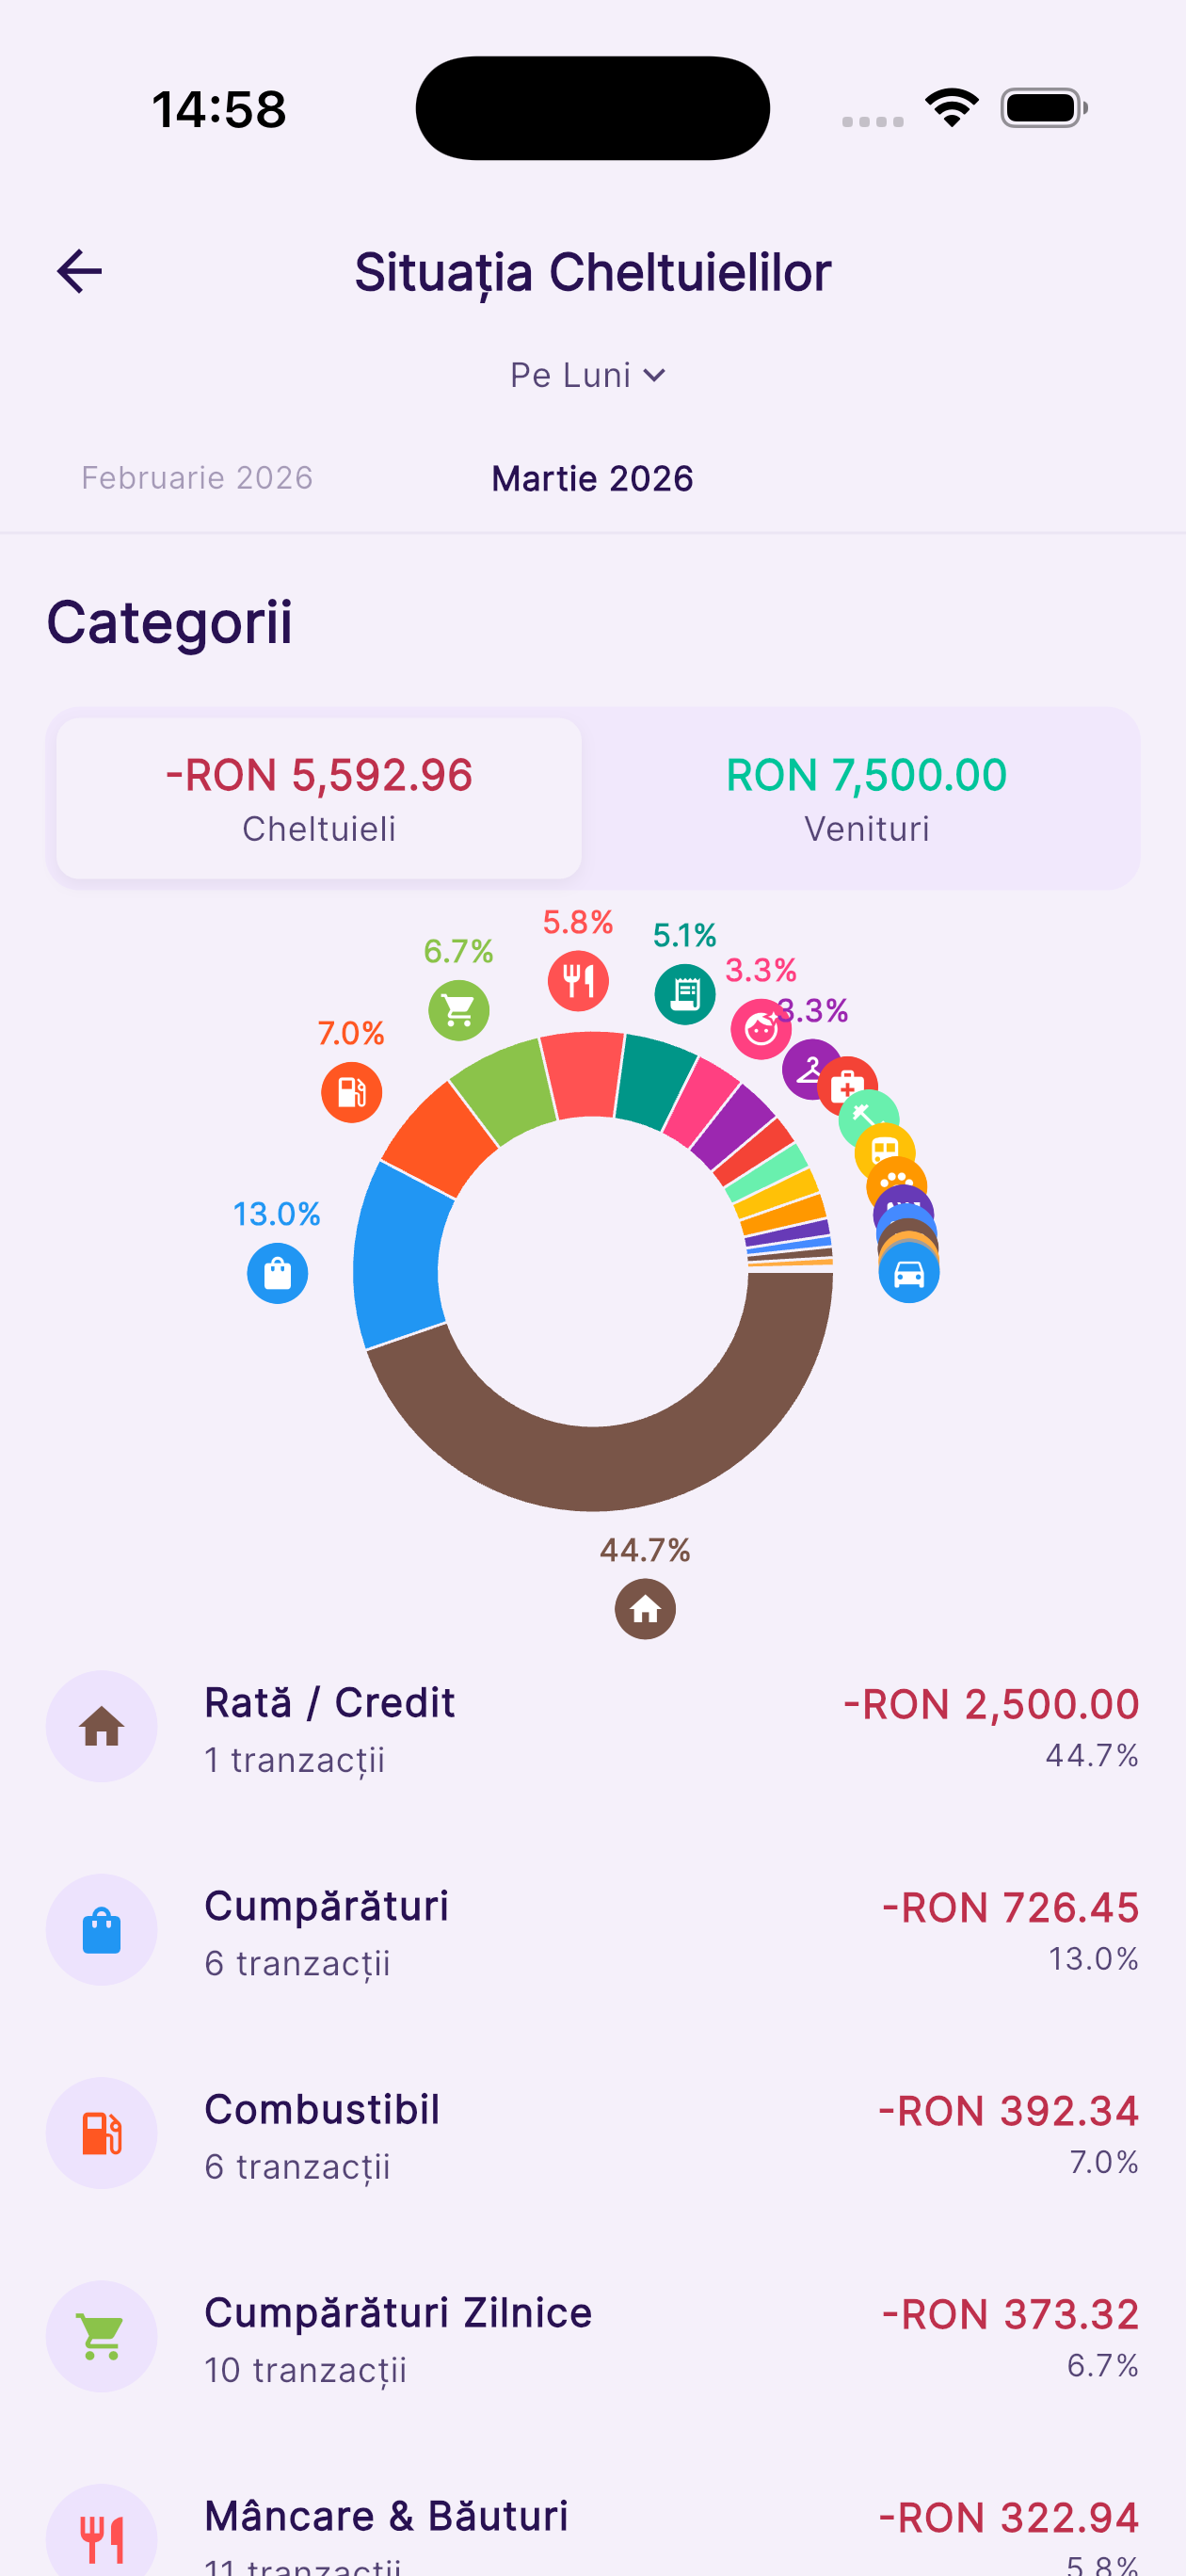
Charts & Analytics.
Visualize your spending patterns with interactive charts — by category, by month, and across all your wallets.
- Go to the Home screen and scroll down to the charts section, or tap any chart widget.
- Toggle between Expenses by Category, Income vs. Expenses, or Monthly Trend using the tab selector.
- Tap any bar or segment on a chart to drill into the transactions for that category or time period.
- Use the month/year selector at the top to browse historical data and compare months.
- The Timeline tab shows a chronological feed of all transactions, grouped by day with daily subtotals.
💡 Tip: Compare two months side by side using the arrow navigation to spot seasonal trends in your spending.
12
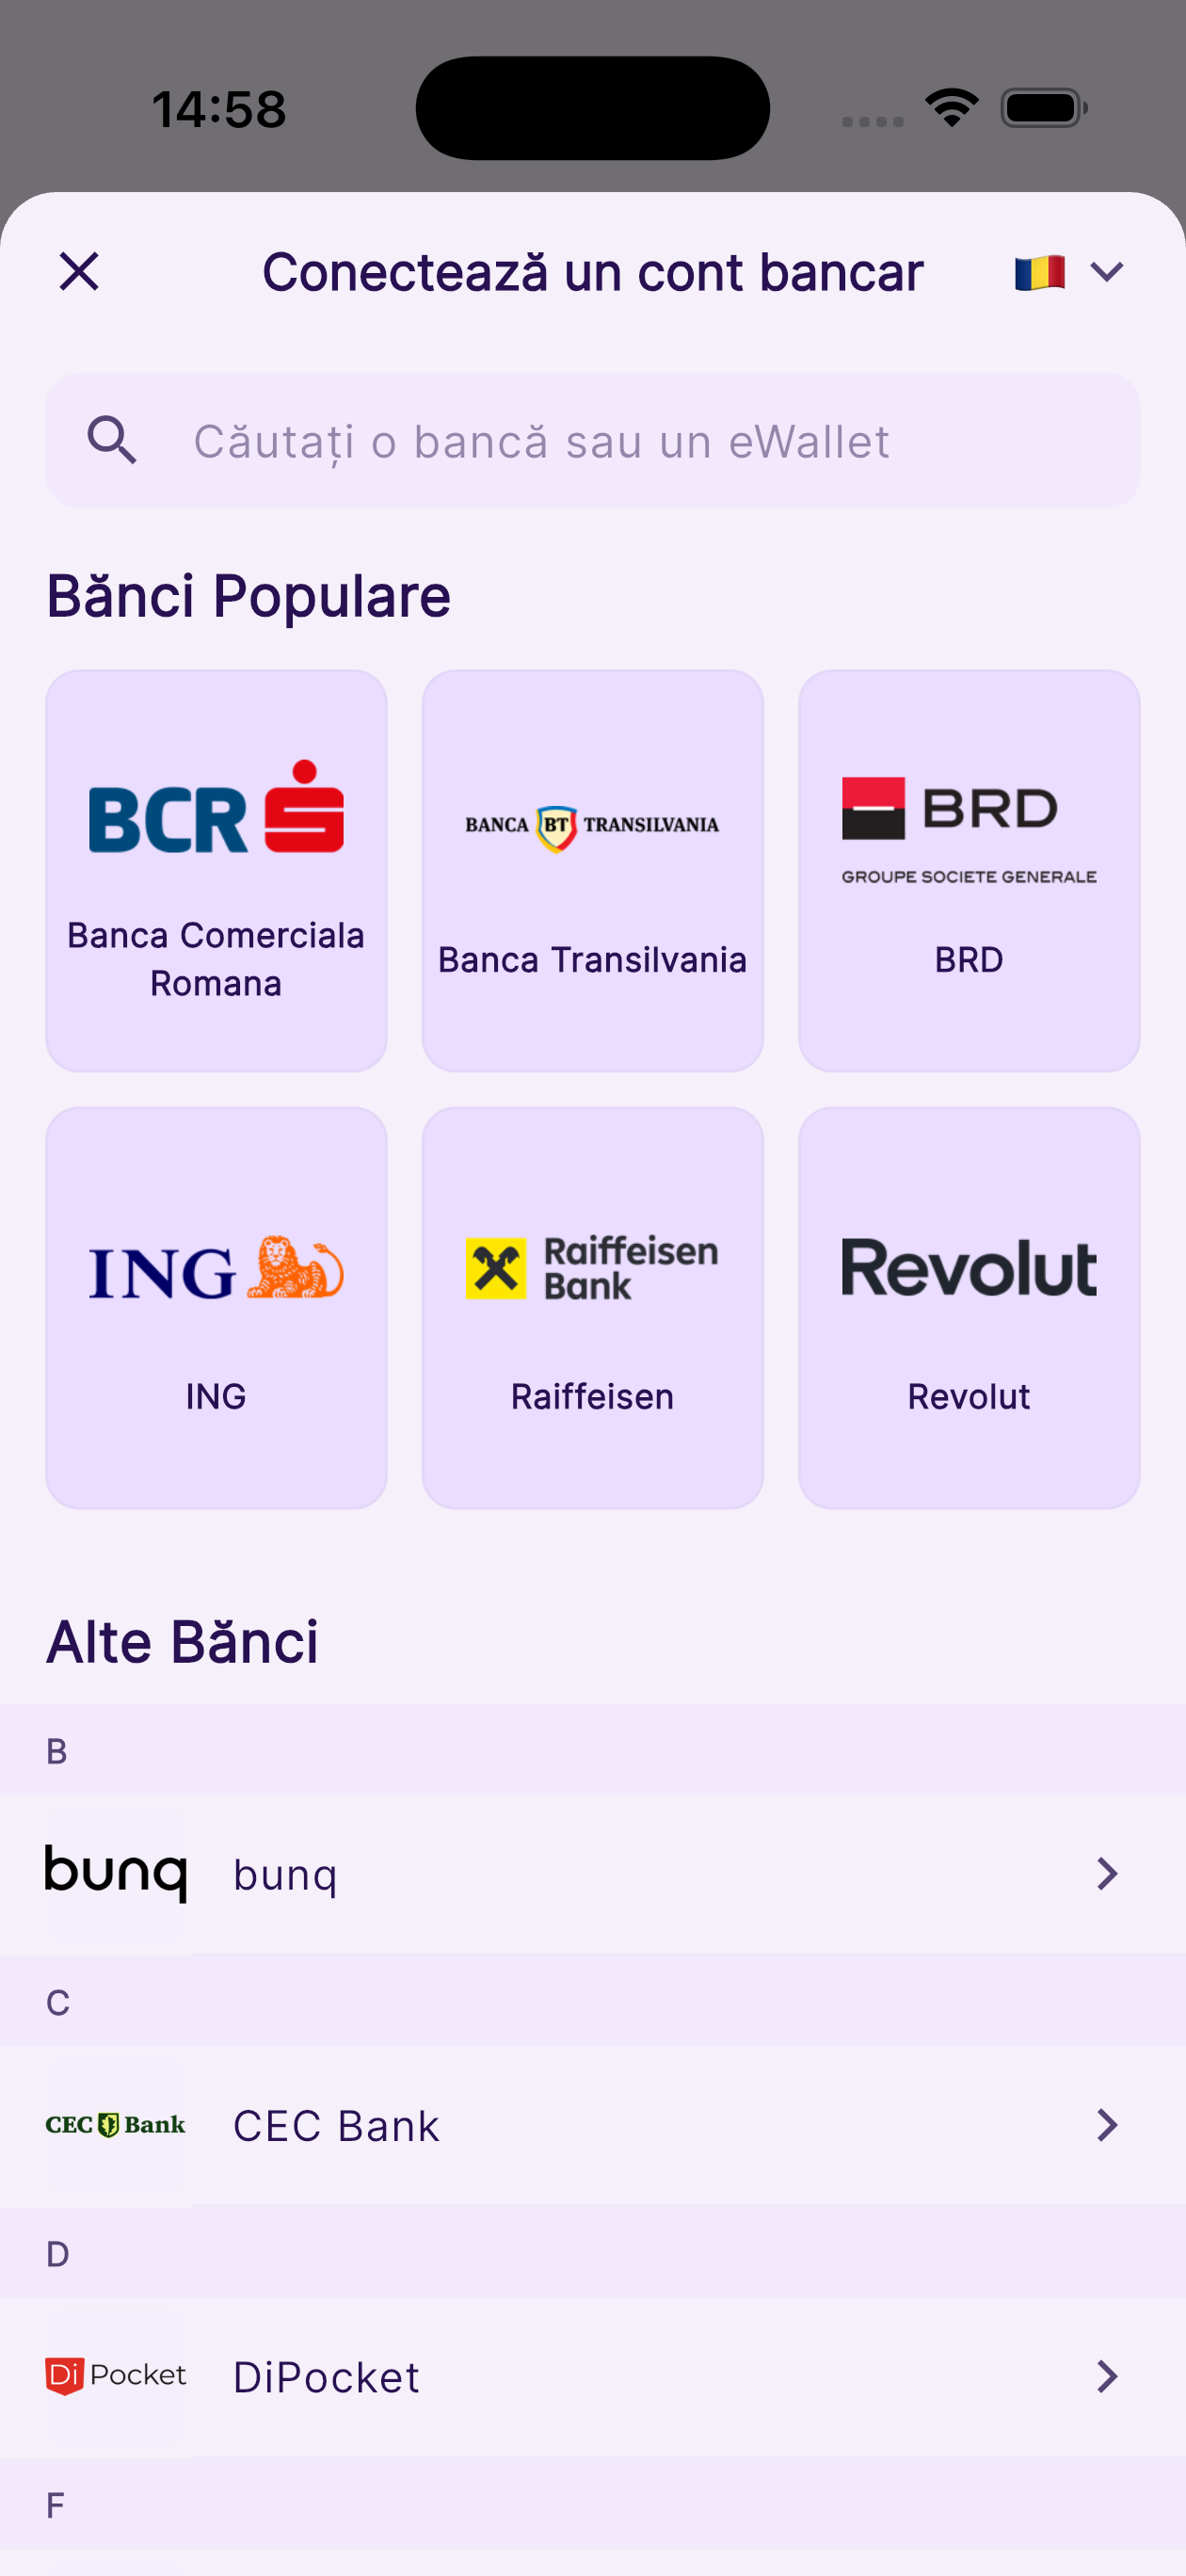
Bank Accounts.
Connect 2,000+ EU banks via PSD2 Open Banking for secure, read-only automatic transaction sync.
- Connect a bank: Go to More → Bank Accounts → tap Add Bank Account. Search and select your bank.
- You'll be redirected to your bank's own secure login page. Enter your bank credentials there — Aura never sees your password.
- Grant read-only access. Your accounts and recent transactions sync automatically within seconds.
- View connections: Go to More → Bank Accounts. Tap a bank to see all linked accounts and their sync status.
- Refresh access: Bank connections expire after a set period (typically 90 days). Tap Refresh Access to re-authorize without re-entering credentials.
- Revoke: Tap a bank → tap Revoke Bank Connection. This removes all linked wallets and their transaction history from Aura.
💡 Tip: Aura only has read-only access. It is technically and legally impossible for anyone to move money or initiate transfers via Aura.
13
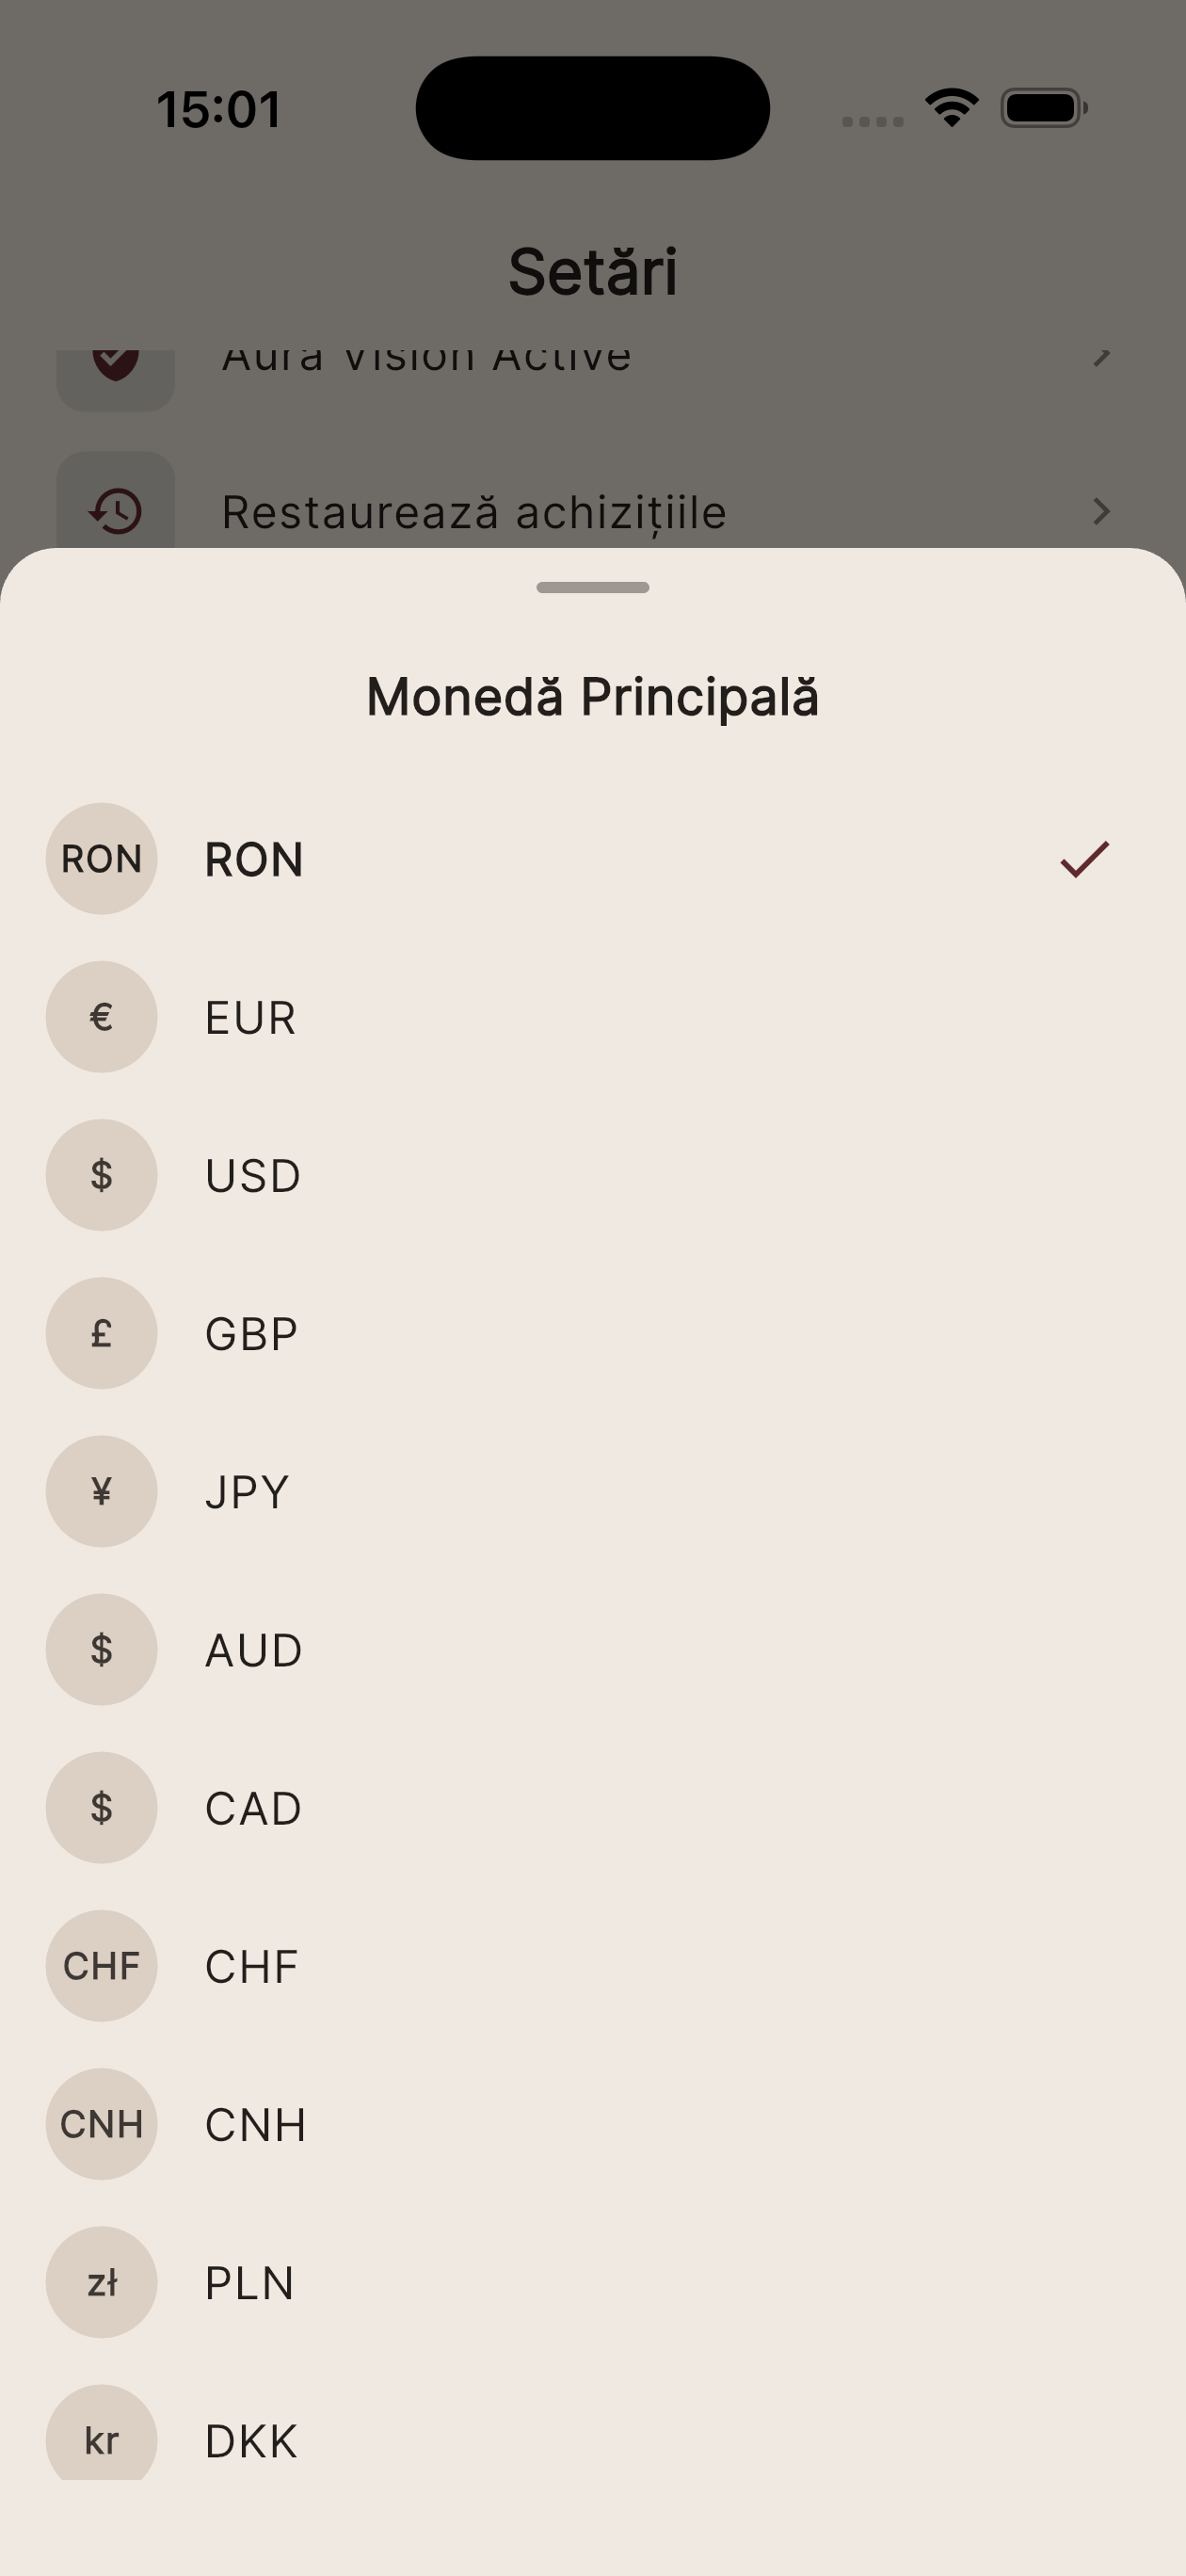
Multi-Currency Engine.
Track wallets in any of 13 currencies and see everything converted to your base currency in real time.
- Your Home screen total shows all wallet balances converted to your base display currency using live exchange rates.
- Set your base currency: Go to More → Settings → Currency. Choose from RON, EUR, USD, GBP, and 9 more.
- Exchange rates update daily from the Open Exchange Rates API. Rates are shown on the currency settings screen.
- Each wallet can hold a different currency. Transactions in that wallet are recorded in the wallet's currency.
- All charts, totals, and budget calculations are converted to your base currency automatically for consistent comparison.
💡 Tip: If you earn in EUR but live in Romania, set RON as your base currency to see your real purchasing power without manual conversion.
14
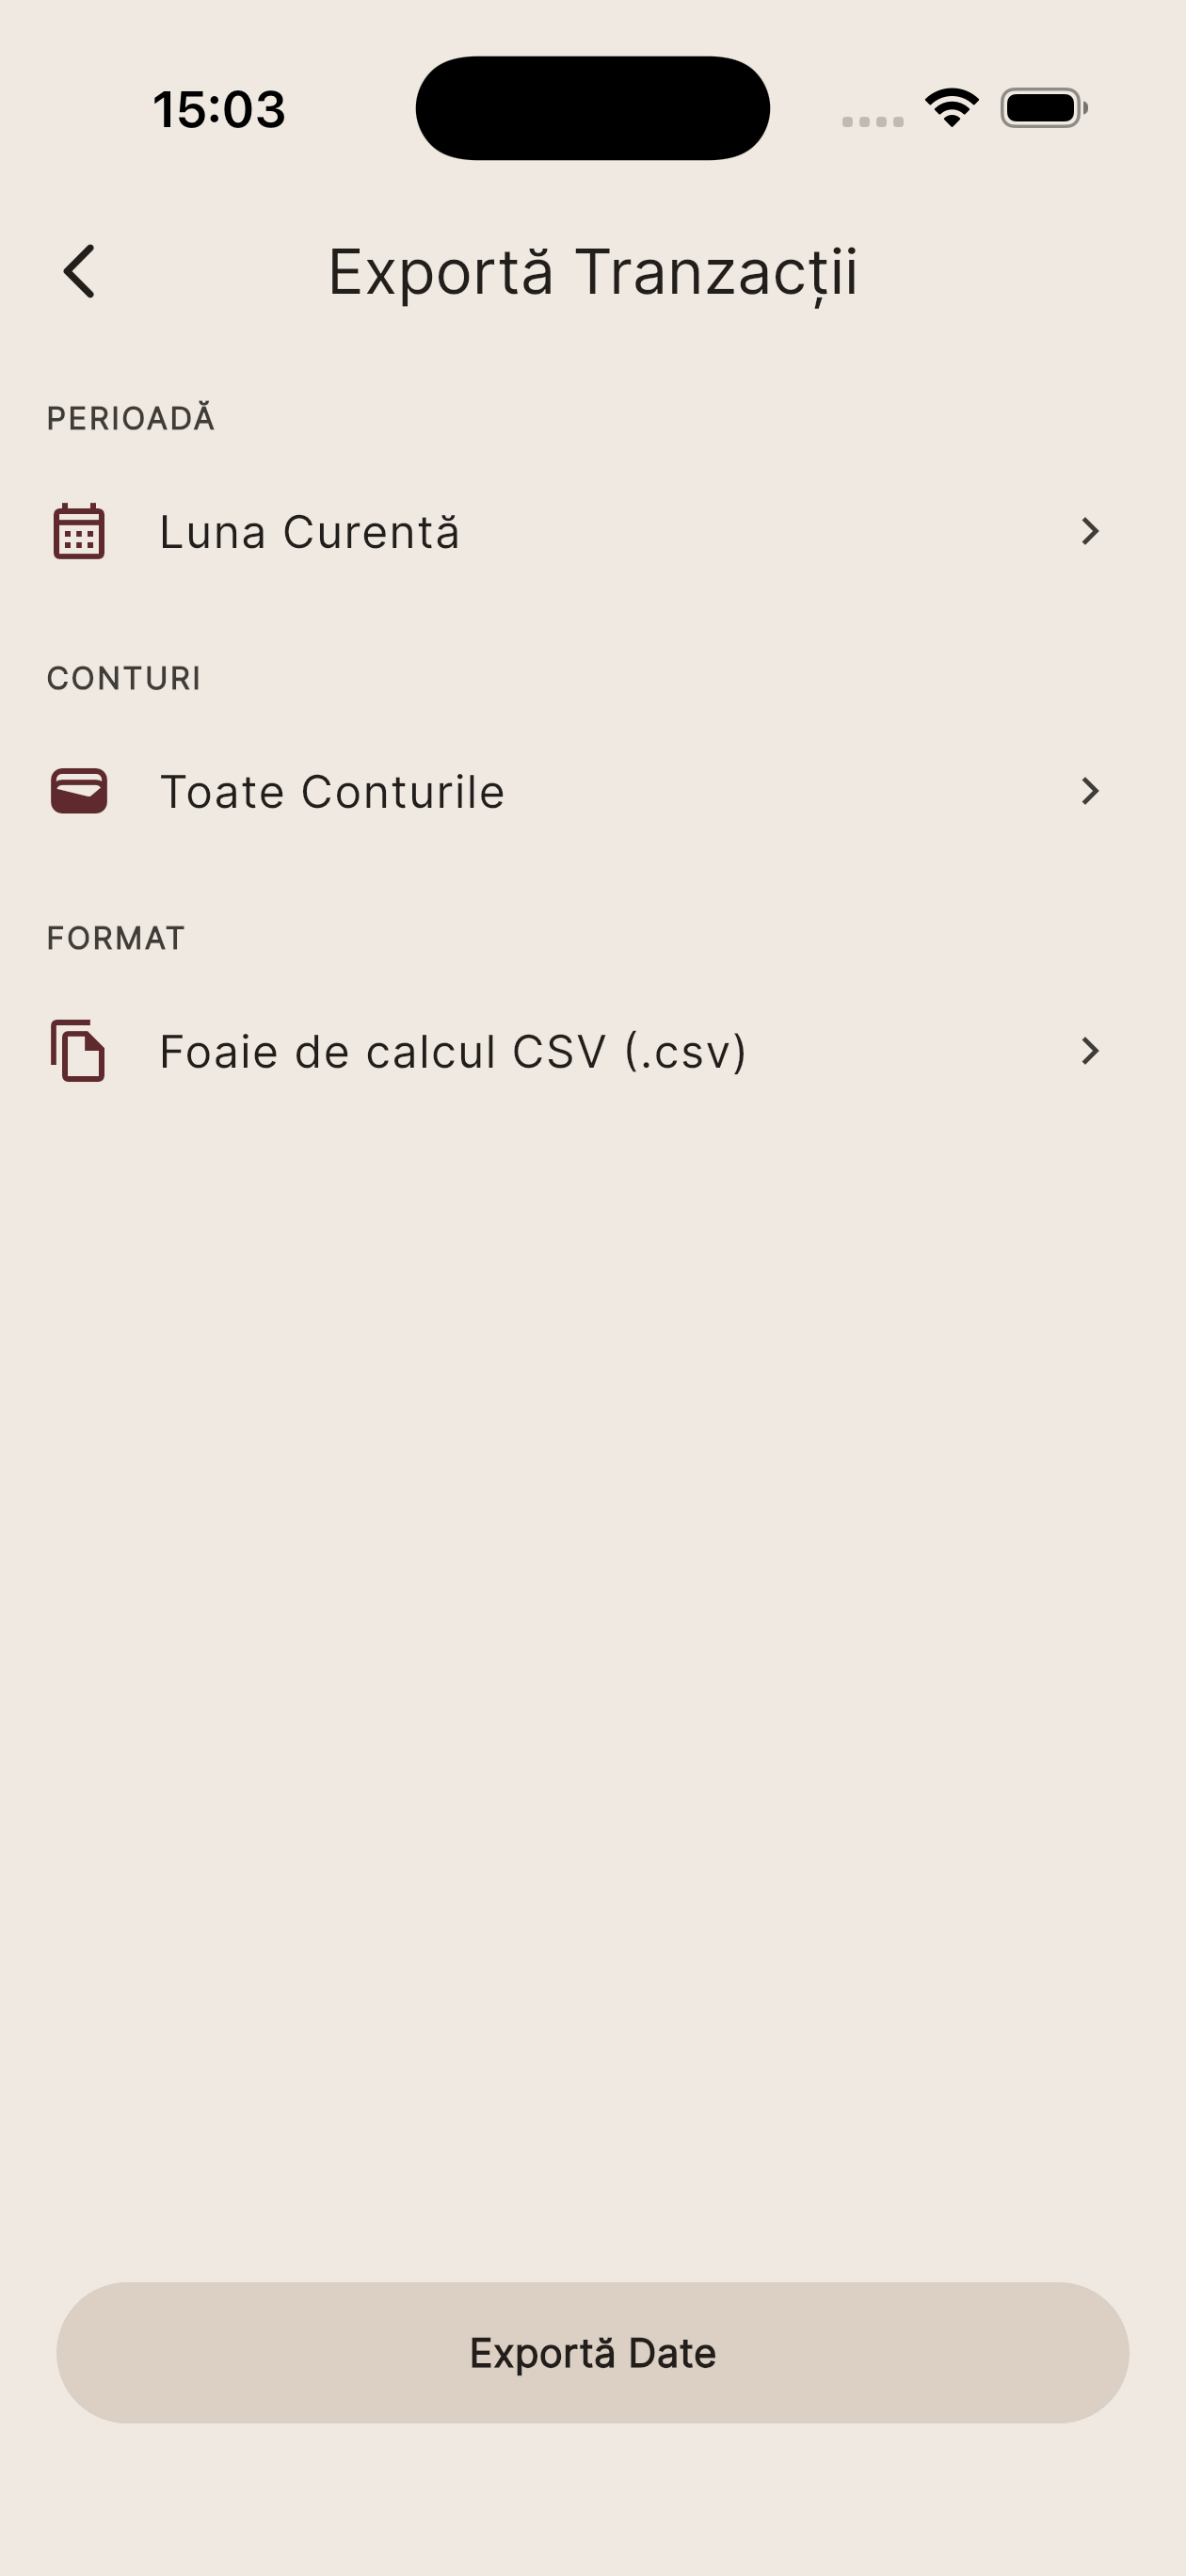
Data Export.
Download a full copy of your financial data in CSV or XLSX format at any time. CSV is free; XLSX requires Vision or Aura tier.
- Go to More → Privacy & Security → Export Data.
- Select a date range (e.g. last month, last year, all time).
- Choose which wallets to include (or leave all selected).
- Select the format: CSV (free, opens in any spreadsheet app) or XLSX (premium, formatted Excel workbook).
- Tap Export. A secure download link is generated. Open it within 15 minutes — the link expires for security.
💡 Tip: Even if your subscription expires, you can always export your data in CSV format from the Account Expired screen — guaranteed by GDPR.
15
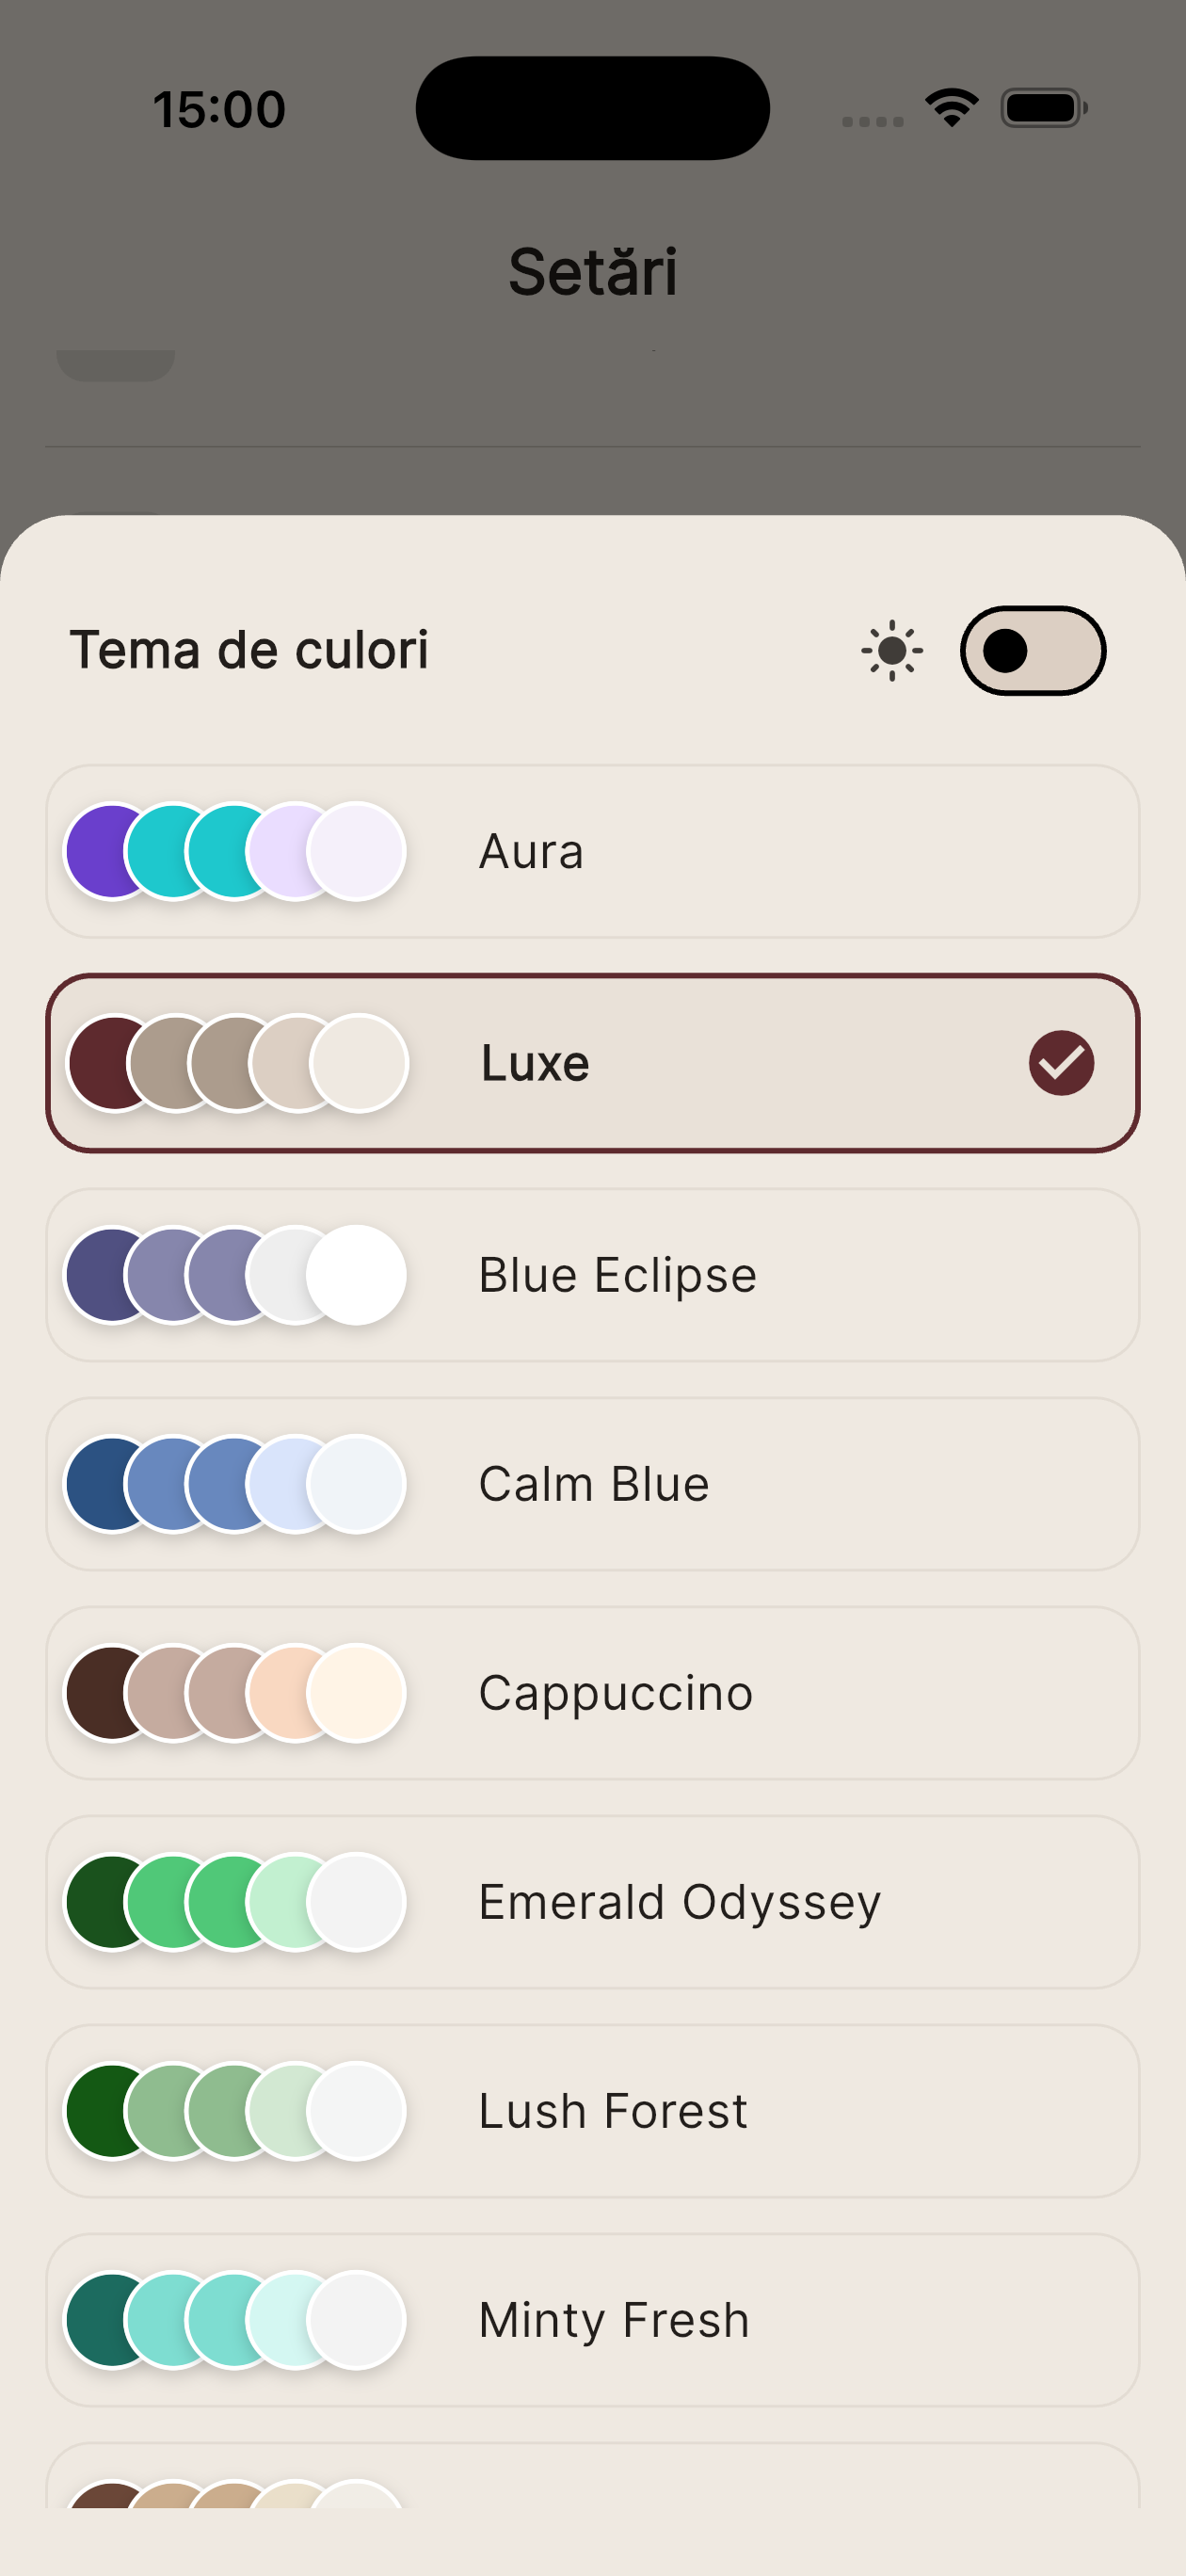
Themes & Appearance.
Personalize Aura with 13 premium color themes, light/dark mode, and your preferred language.
- Go to More → Appearance.
- Browse the 13 color themes — tap any to preview it instantly. The app updates in real time.
- Toggle between Light, Dark, or System mode using the mode selector.
- Scroll to the Language section. Choose from English, Romanian, Spanish, French, German, Italian, Polish, Portuguese, or Hungarian.
- All changes apply immediately — no restart required.
💡 Tip: System mode automatically switches between light and dark based on your device's display settings.
16
Passcode & Biometrics.
Lock Aura with a PIN or Face ID / Touch ID to protect your financial data if your device is lost or accessed by others.
- Go to More → Privacy & Security.
- Enable Passcode: Toggle Enable Passcode → enter a 4-digit PIN → confirm it.
- Enable Biometrics: After setting a passcode, toggle Enable Biometrics to use Face ID or Touch ID as the unlock method.
- Once enabled, the app locks automatically when moved to the background and prompts for authentication when you return.
- Disable passcode: Go back to Privacy & Security → toggle off Enable Passcode → enter your current PIN to confirm.
💡 Tip: If you forget your PIN, log out and log back in. Your financial data is stored securely in the cloud and will resync.
17
Account & Privacy.
Manage your subscription, export or delete your data, and exercise your GDPR rights — all from within the app.
- Manage subscription: Go to More → Subscription. View your current plan, upgrade, downgrade, or cancel. You can also manage via App Store or Google Play.
- Export your data (GDPR Right to Portability): Go to More → Privacy & Security → Export Data. Download a complete CSV of all your transactions and account data.
- Delete your account: Go to More → Privacy & Security → Delete Account. Read the warning carefully — this action is permanent and irreversible.
- Tap Confirm Delete. Your account, all transactions, budgets, categories, and bank connections are permanently erased from Aura's servers.
- Revoke bank connections before deleting if you want to keep using those bank accounts in other apps — revoking removes Aura's read access.
ℹ️ Note: Aura never shares your financial data with third parties for advertising. Full details are in the Privacy Policy.
18
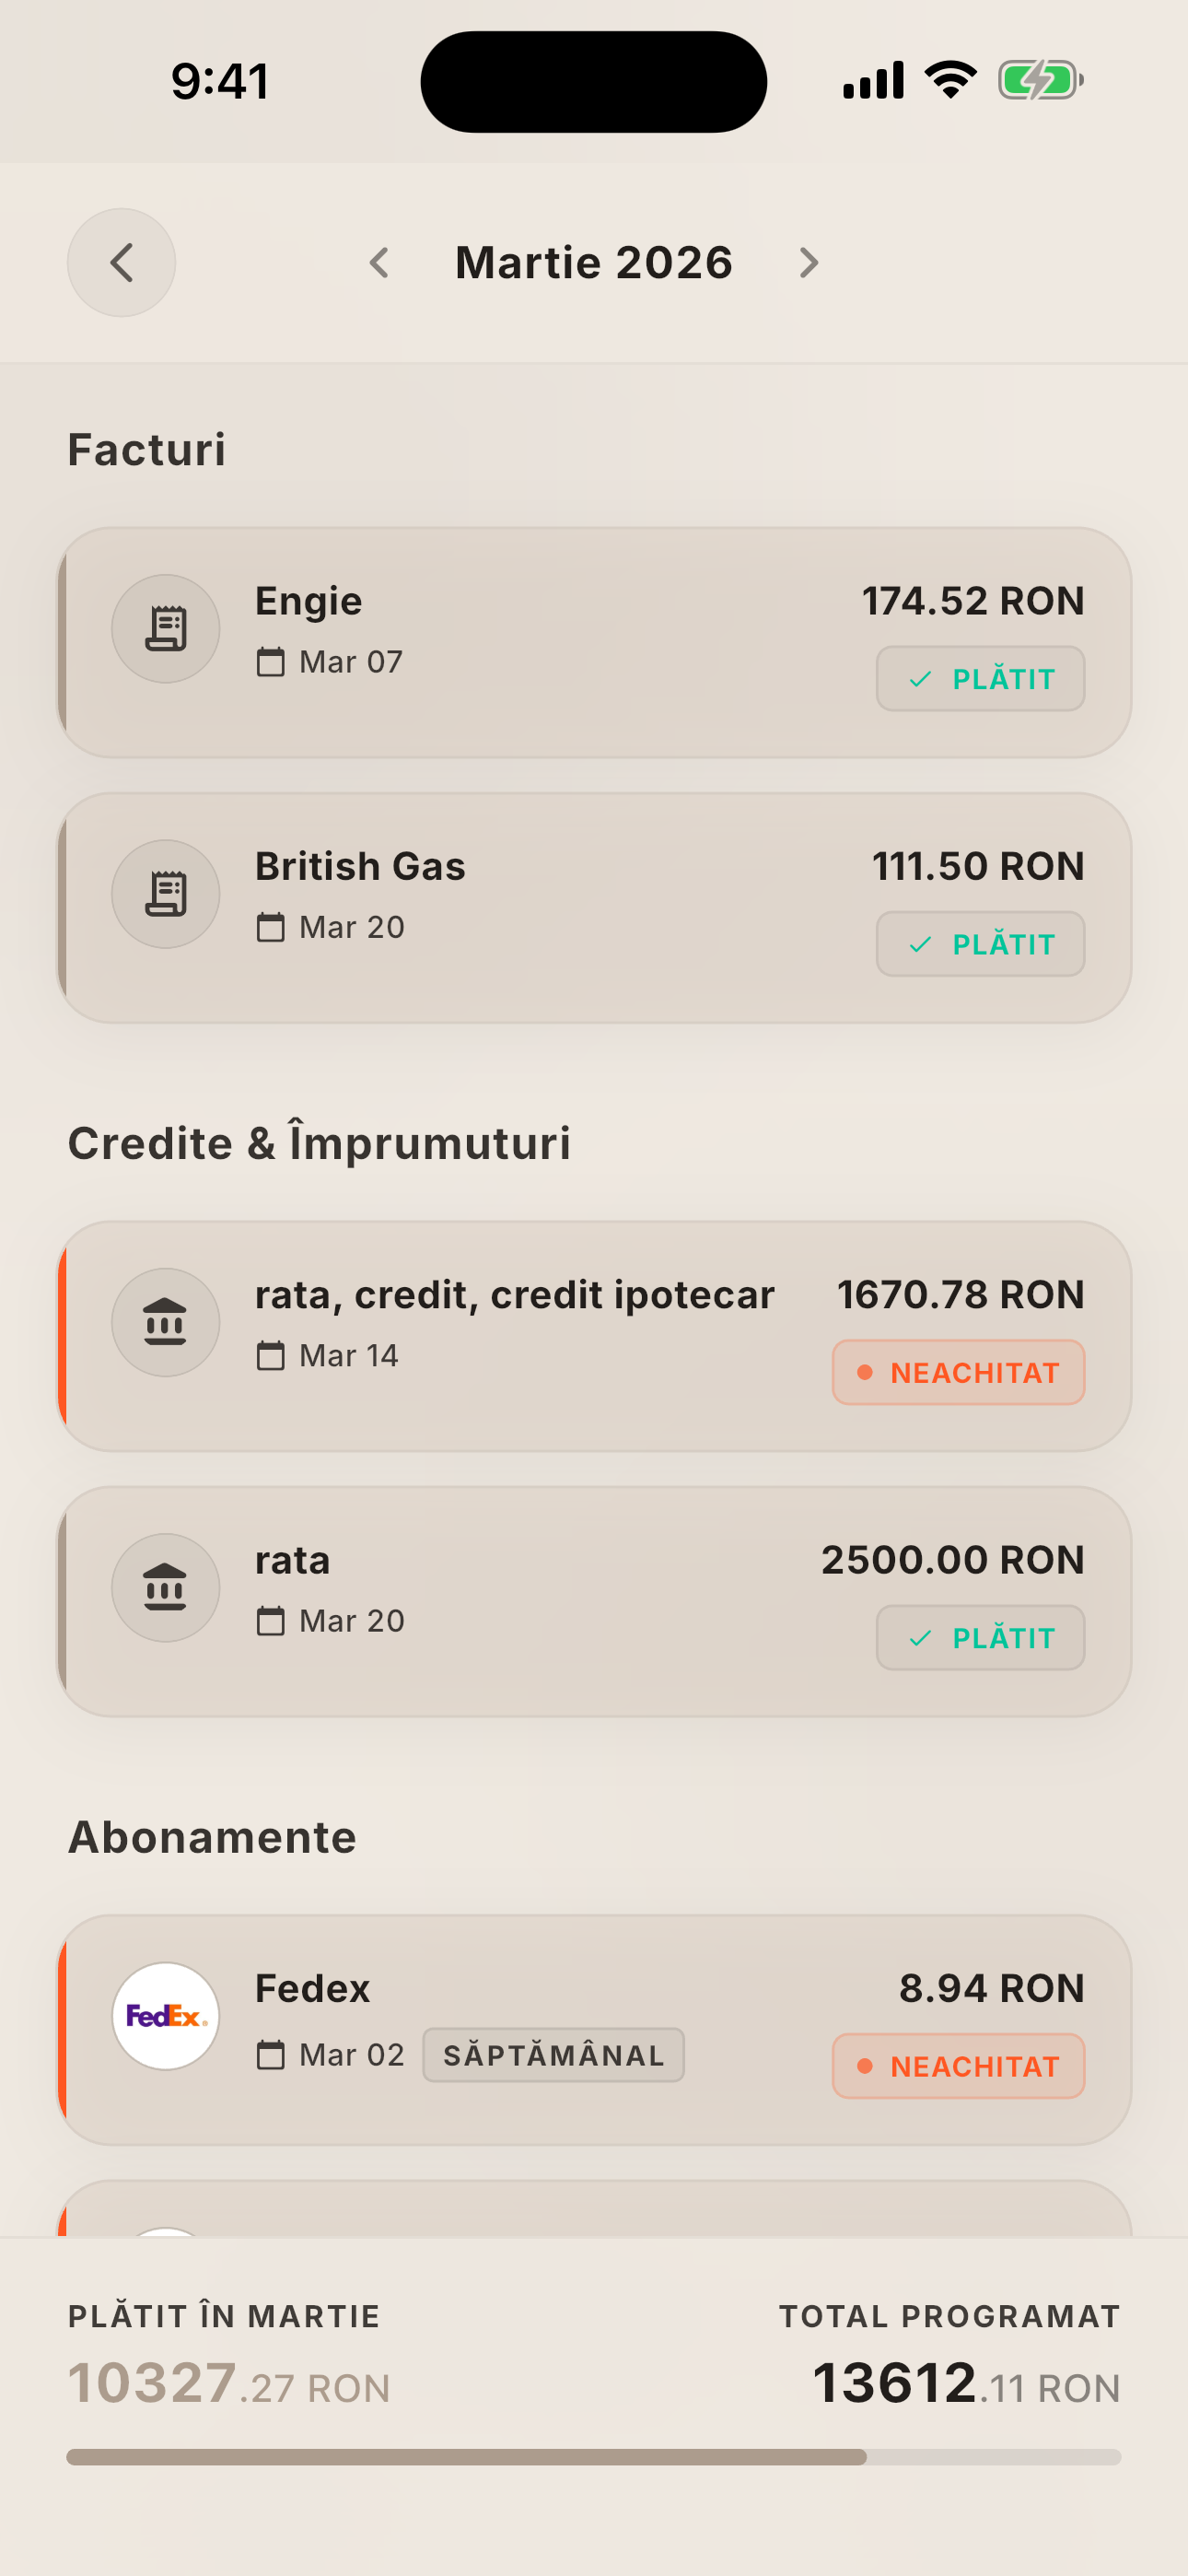
Financial Calendar.
See all upcoming bills, loans, subscriptions and recurring transactions arranged month by month — so you're never caught off guard.
- Tap the Calendar tab in the bottom navigation.
- Browse month by month using the arrows at the top. Every month shows all planned financial events.
- Section order: Bills → Mortgages & Loans → Subscriptions → Recurring Transactions → Budgets.
- Events show paid (green checkmark) or unpaid (pending) status. Paid events are matched to a real transaction.
- Tap any bill reminder (user-created) to edit or delete it.
- To create a new reminder: go to More → Financial Calendar → Add Bill, enter name, amount, due date and recurrence.
💡 Tip: Mortgage and loan projections are estimated from the last 3 months of transactions — no setup required.
19
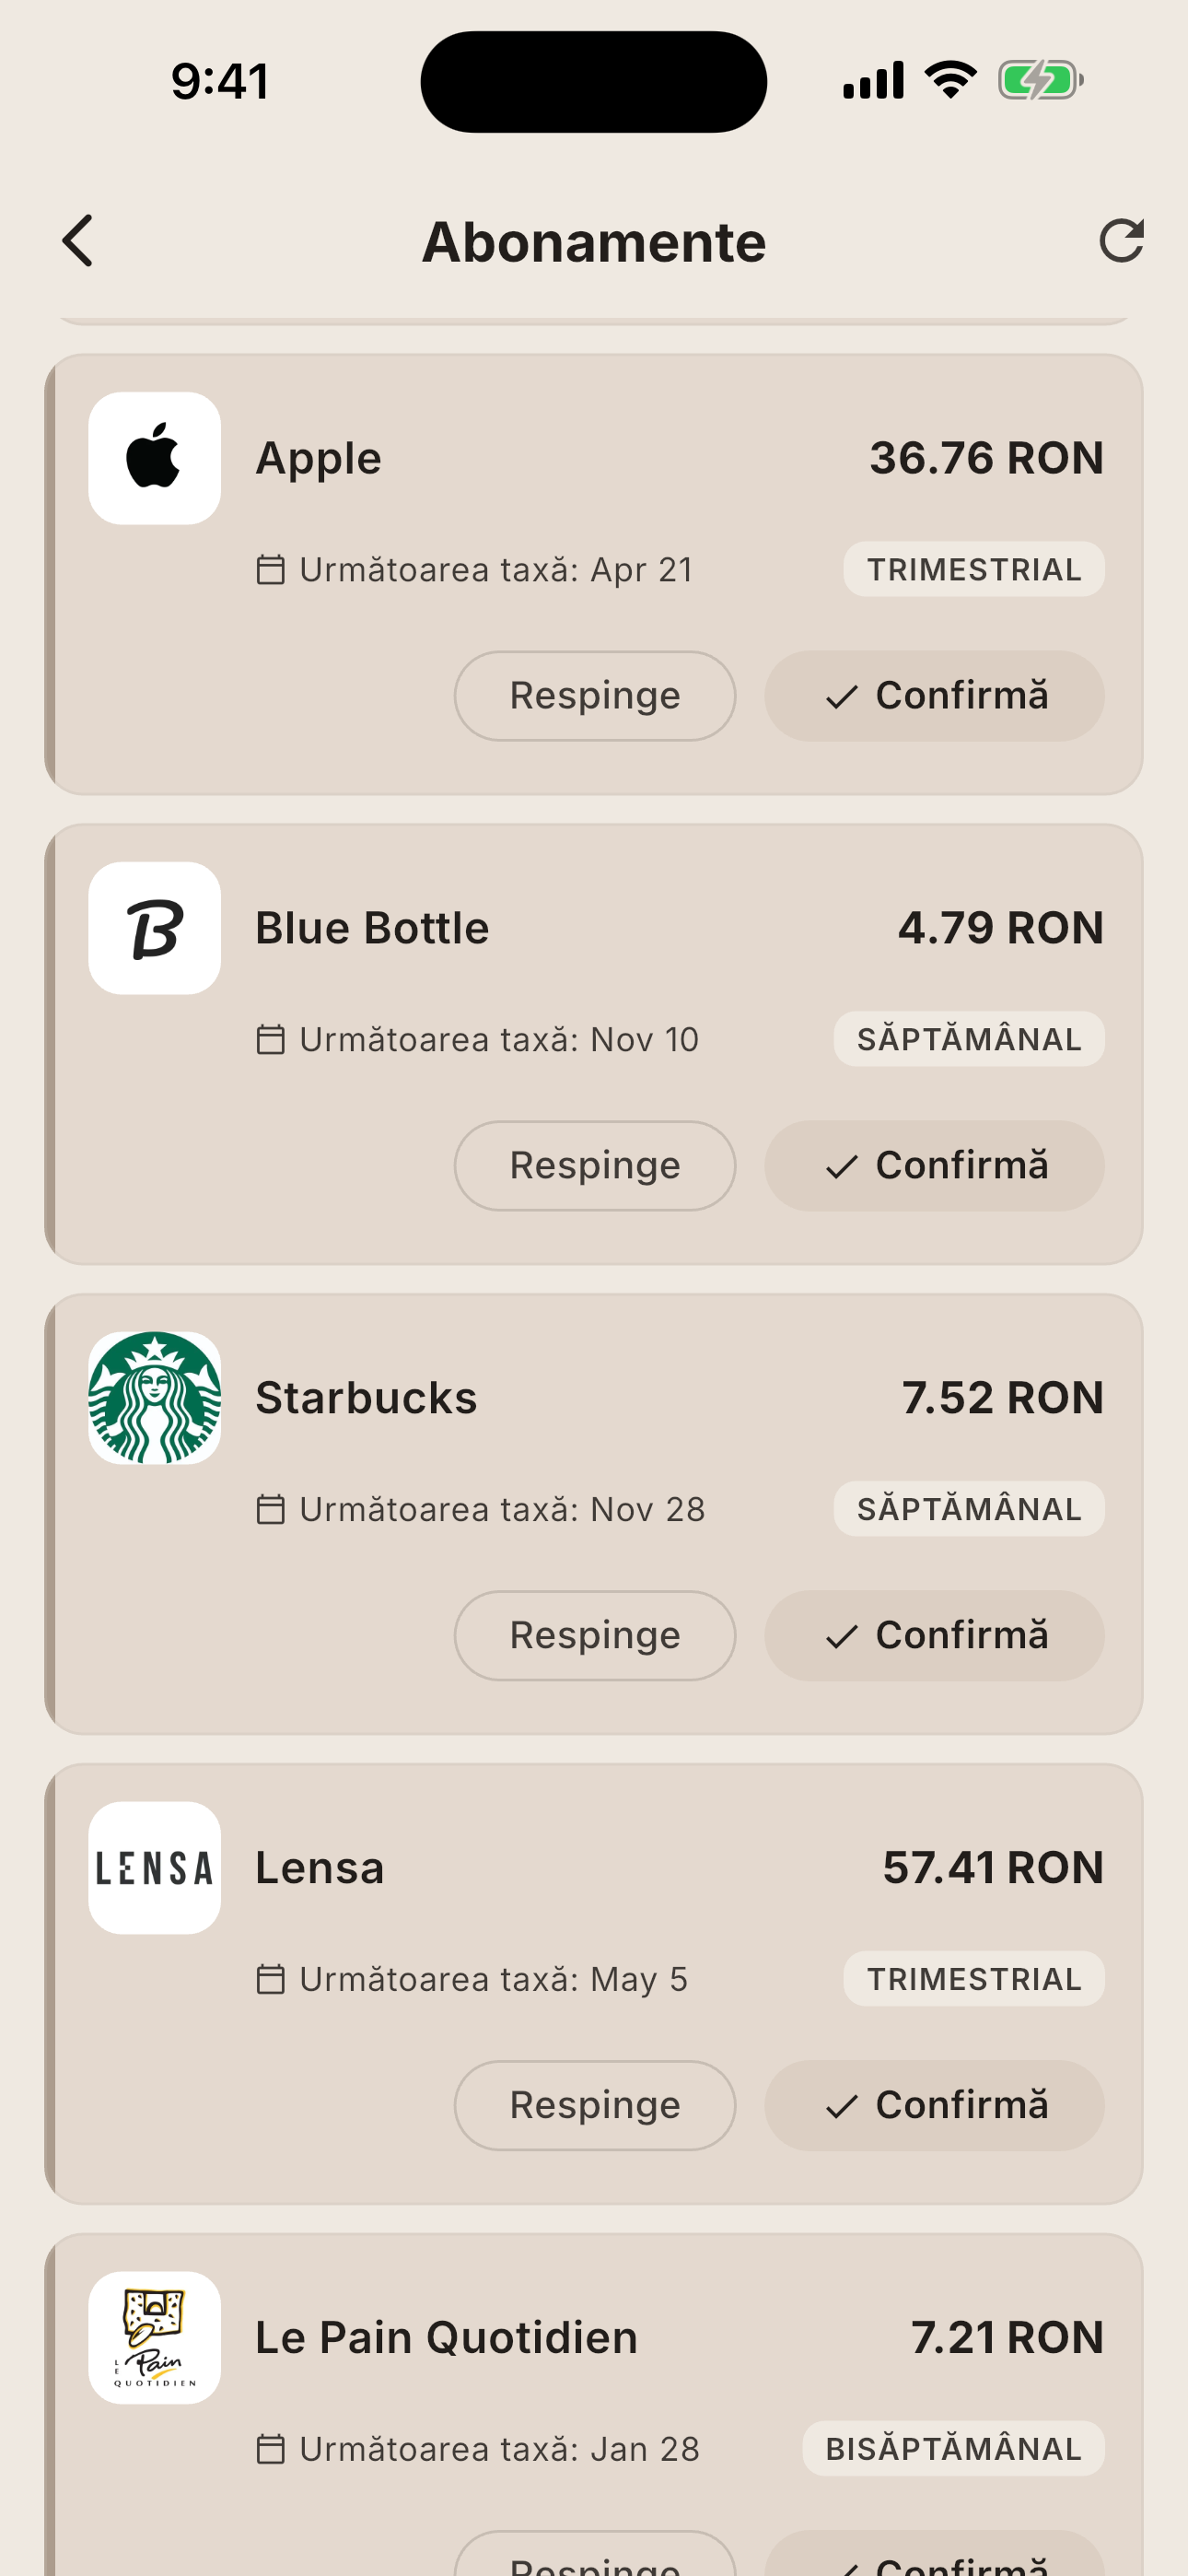
Subscription Detection.
Aura's AI automatically identifies recurring charges from your bank history and gives each one a face — logo, amount, and renewal date.
- Go to More → Subscriptions. Aura automatically scans the last 180 days of bank transactions.
- Detected subscriptions appear with the brand logo, amount, frequency, and next renewal date.
- Confirm or Dismiss each detected subscription using the action buttons. Dismissed subscriptions won't appear again.
- Confirmed subscriptions are saved and appear in your active subscriptions list.
- One day before renewal you'll receive a push notification for each confirmed subscription.
- Tap any confirmed subscription to view its full history or remove it.
💡 Tip: Subscriptions require at least 2 occurrences within 180 days, with no more than 10% variation in amount.
20
Net Worth.
Your complete financial picture: all assets minus all liabilities, with AI analysis to understand the trend.
- Go to More → Net Worth. Net worth is calculated automatically from all your connected accounts and wallets.
- The animated number at the top is your current net worth: total assets minus total liabilities.
- The split bar visually shows assets (mint) vs. liabilities (red) at a glance.
- Add a liability: Tap (+) → choose a type (Mortgage, Car Loan, Credit Card, Personal Loan, Student Loan, Other) → enter name, amount, and currency.
- Edit or delete a liability by tapping it and using the AppBar actions.
- Scroll down to view the AI analysis card with a personalised observation about your net worth trend.
💡 Tip: Your bank accounts and wallets are your assets. Add liabilities manually to get a true financial picture.
21
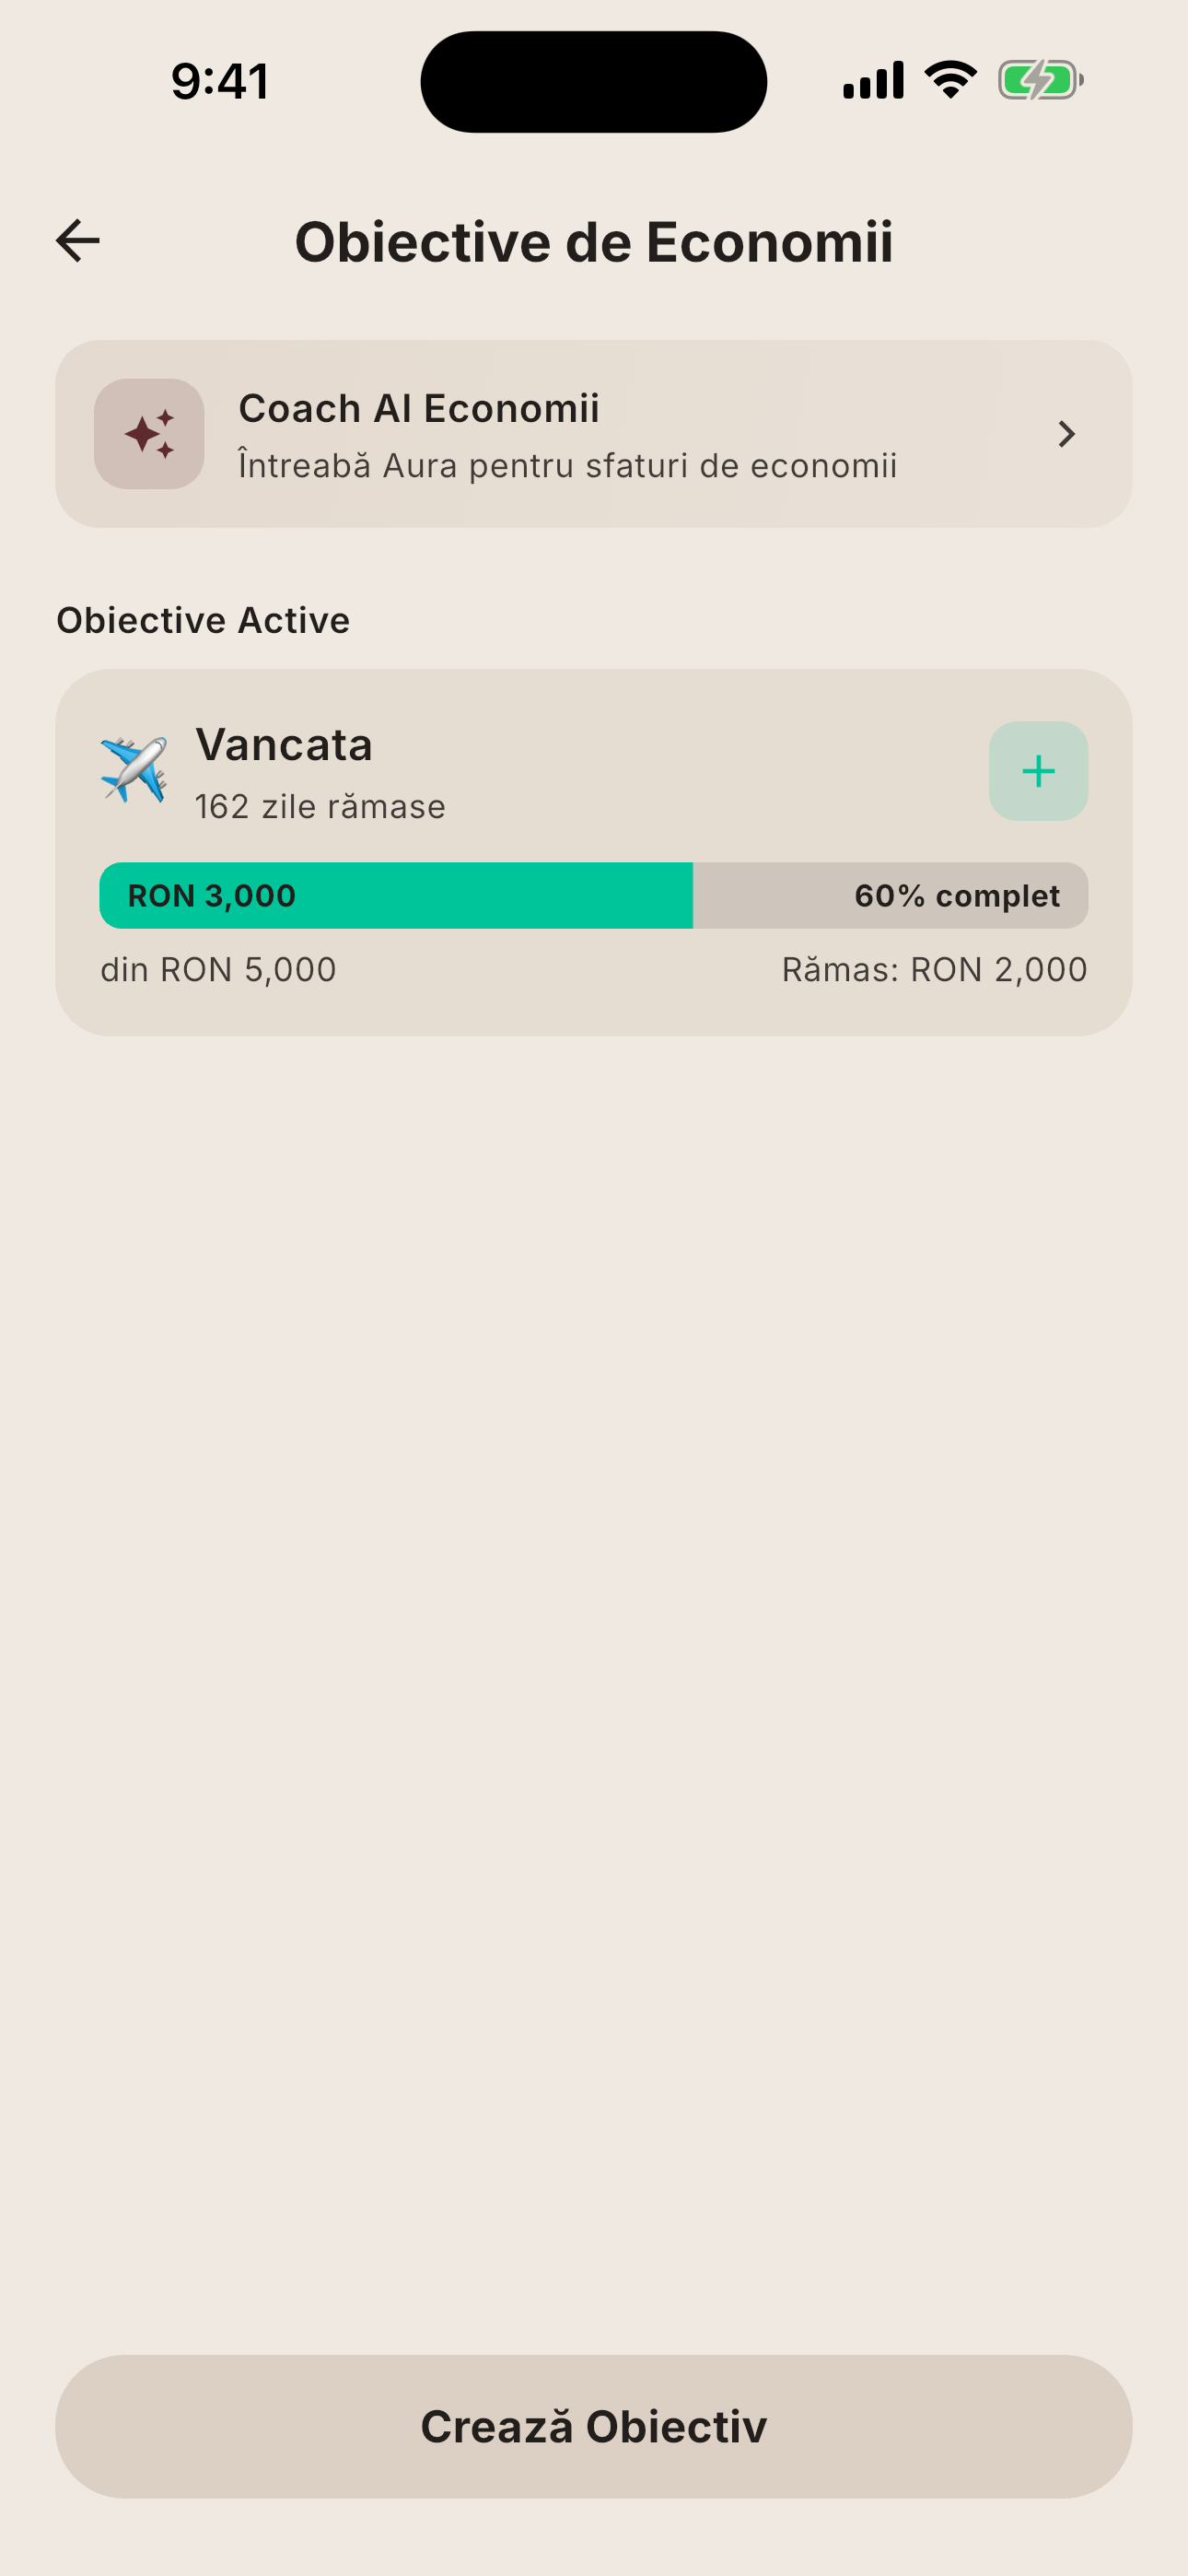
Savings Goals.
Create goals with a target amount and deadline. Make contributions, hit milestones, and watch your dreams take shape.
- Go to More → Savings Goals → tap (+) to create a new goal.
- Enter a name, choose an emoji icon, set a target amount and target date.
- Tap Save. Your goal appears as a progress card.
- Add a contribution: Open a goal → tap Add Contribution → enter the amount.
- Milestone celebrations appear automatically at 25%, 50%, 75% and 100% completion.
- When a goal reaches 100%, it is automatically marked as achieved and you receive a push notification.
💡 Tip: Use goals for an emergency fund, a vacation, a new gadget, or anything worth working towards.
Still have a question?
Our support team is happy to help. Send us an email and we'll get back to you within 24 hours.
Contact Support